


2. INGREDIENTS IN GLUTEN FREE SOURDOUGH BREAD
I have broken down the ingredients list into easy to understand parts.
- LEAVEN
- SOAKER
- GEL
- STARCHES
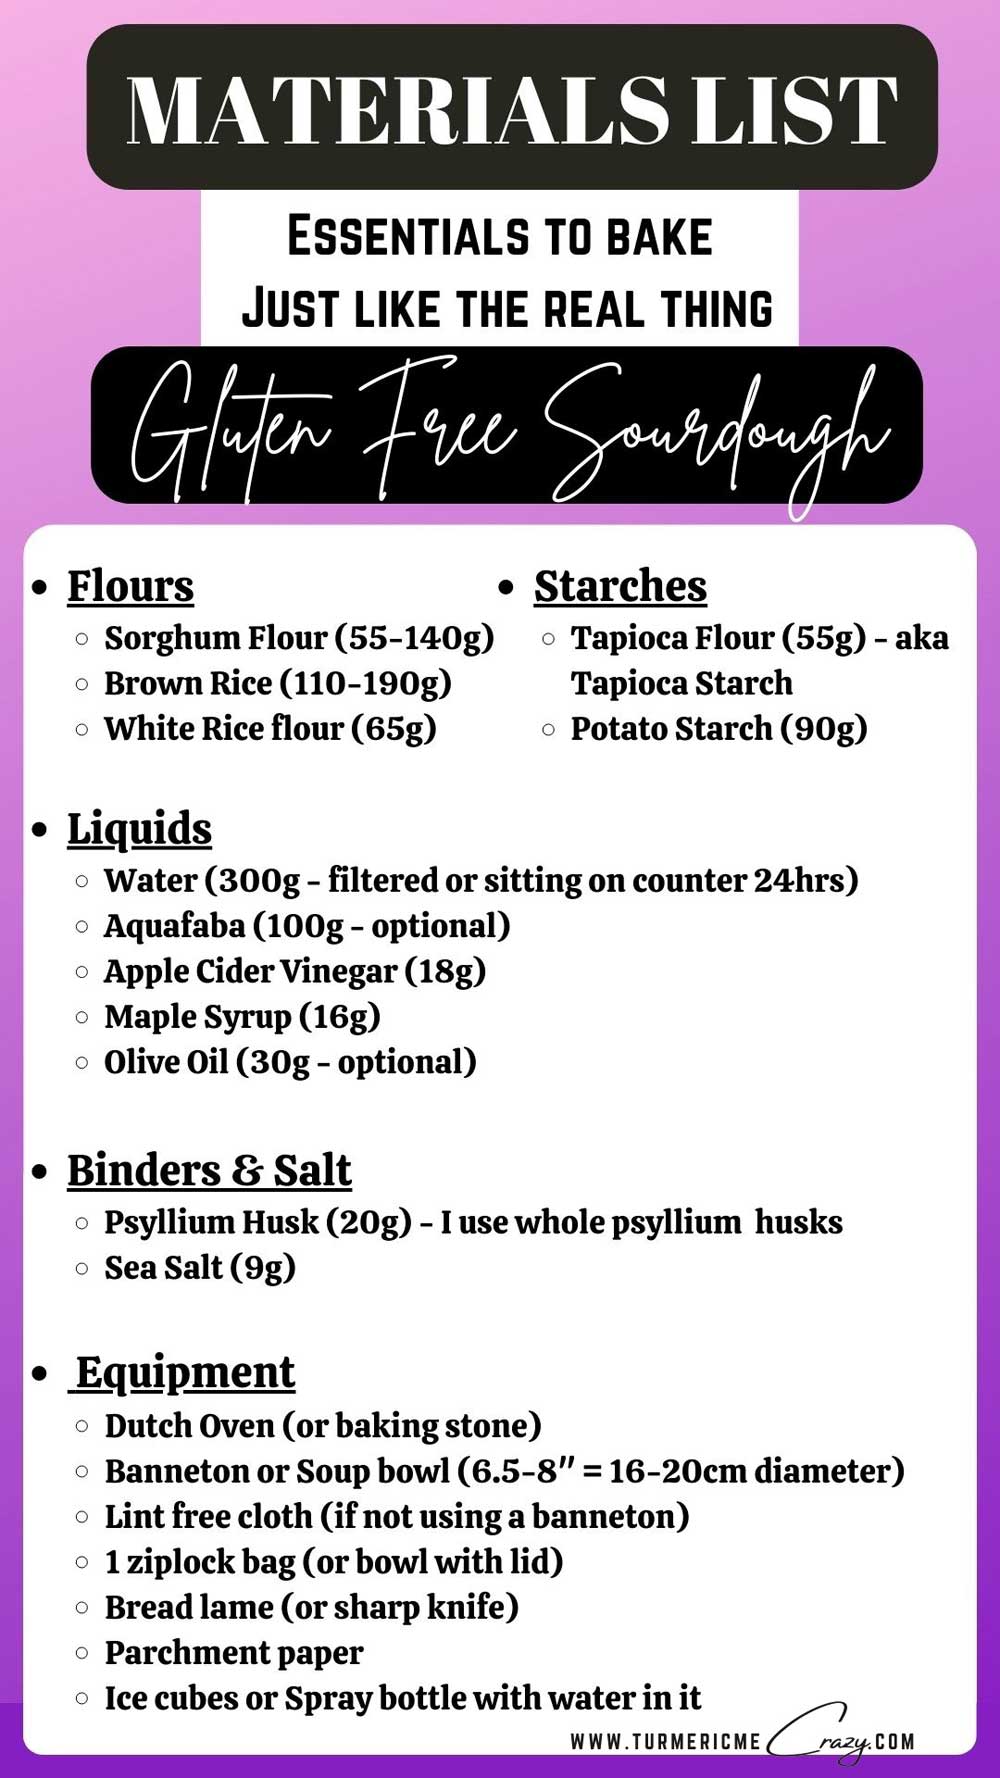
3. MATERIALS LIST
The essentials you need to bake gluten free sourdough bread.
4. MY 6-STEPS TO MAKE GLUTEN FREE SOURDOUGH BREAD - in action (with videos)
Easily make delicious Gluten Free Sourdough Bread in 6-simple steps using my video guide.
5. FREE BAKING TIMELINE
Get my FREE Baking Timeline which takes all of the guesswork out of planning your bake!

7. Frequently Asked Questions (FAQ)
Can’t find the answer to your question? Please feel free to contact me anytime in the comments below or privately on my contact page.
Here I’ll answer questions regarding:
- How to FREEZE Gluten Free Sourdough Loaf?
- Importance of WEIGHING the ingredients.
- Questions regarding the LEAVEN
- and more…


WHAT IS PSYLLIUM HUSK?
- Psyllium Husk (whole)
-
- Psyllium Husk is very rich in fibre &is incredibly good for the intestinal tract. In fact, it enhances the digestive process, can help improve & prevent constipation and haemorrhoid pain & has prebiotic effects. Research is even showing it can help manage diabetes and may even lower risk of developing diabetes! On top of all of that psyllium husk is heart healthy, may help decrease blood pressure, decrease cholesterol & can help with weight management. It contains antibacterial compounds that help eliminate toxins in the body & in turn give you healthy glowing skin! You can find whole psyllium husk at most grocers and health stores (e.g. Blush Lane Organics & Community Health Foods in Calgary).
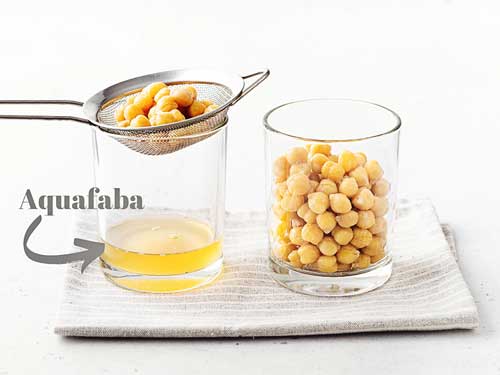
WHAT IS AQUAFABA?
2. Aquafaba (liquid from chickpeas)
-
- You can either use dried chickpeas and soak them in water overnight or drain a can of chickpeas. Aquafaba acts like an egg does in baking and helps bind the ingredients together beautifully. This is an optional ingredient and will make your loaf much fluffier & lighter. If you don’t like that texture, just omit & replace the aquafaba with the equal amount of water.
3. Apple Cider Vinegar
-
- Apple Cider Vinegar is used to strengthen the dough. I like to use Bragg’s raw unfiltered Apple Cider Vinegar for its purity and flavour.
4. Olive Oil
-
- Extra Virgin Olive Oil adds moisture and a boost of heart healthy fats. My favourite is this brand which I get at Costco. Just a little oil, softens the dough & gives it a fluffier texture. This dough enrichment is optional. If you prefer your bread less fluffy, simply omit the oil & replace with more water.
5. Maple Syrup
-
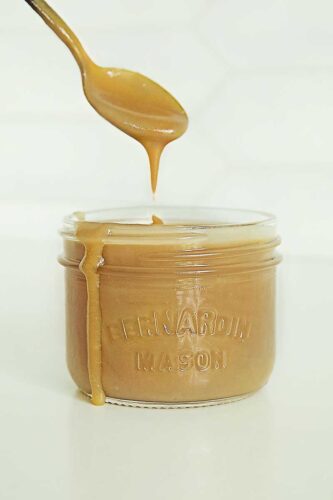
- Pure maple syrup is a true Canadian delicacy! It gives more food for the yeast, increasing activity and always lends an incredible flavour!
6. Salt
-
- Either a nice sea salt or kosher salt lends a good flavour to the dough. We don’t add the salt to the soaker as it slows down fermentation.

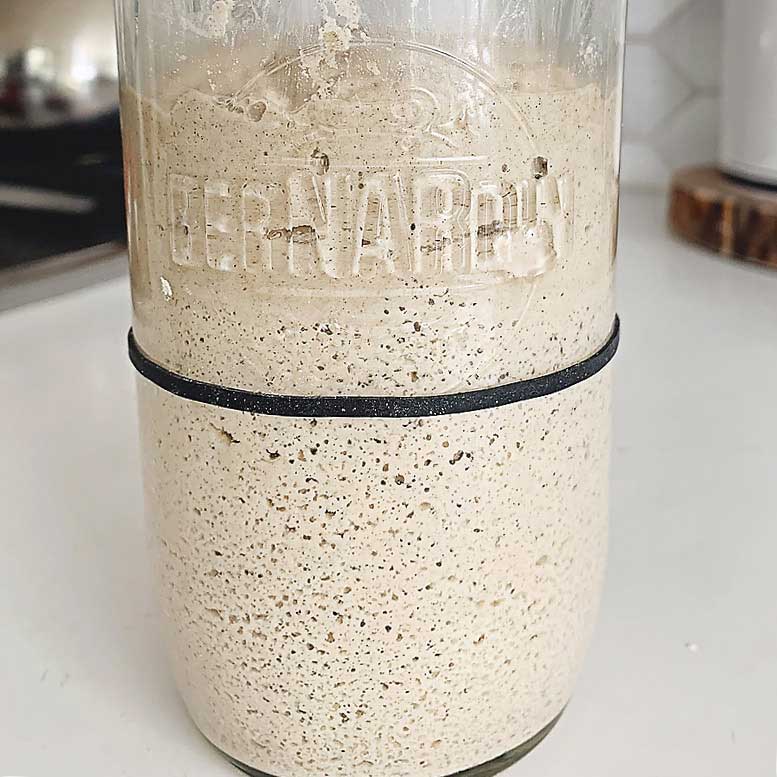
Say you want to bake on Saturday for example, you will feed your starter on Friday evening. Depending on your starters environment, it will peak either overnight or the next morning. If you find your starter is slower (e.g. in a colder climate), simply increase the Starter : Feed ratio, basically keep more starter & feed it less! For instance, you could take 30g starter and feed it 75g flour & 75g water. The reverse is also true for a hot environment.
STARTER READINESS CHECKLIST
Follow my starter readiness checklist to decide when your sourdough starter is at its peak rise and ready to mix your leaven! 
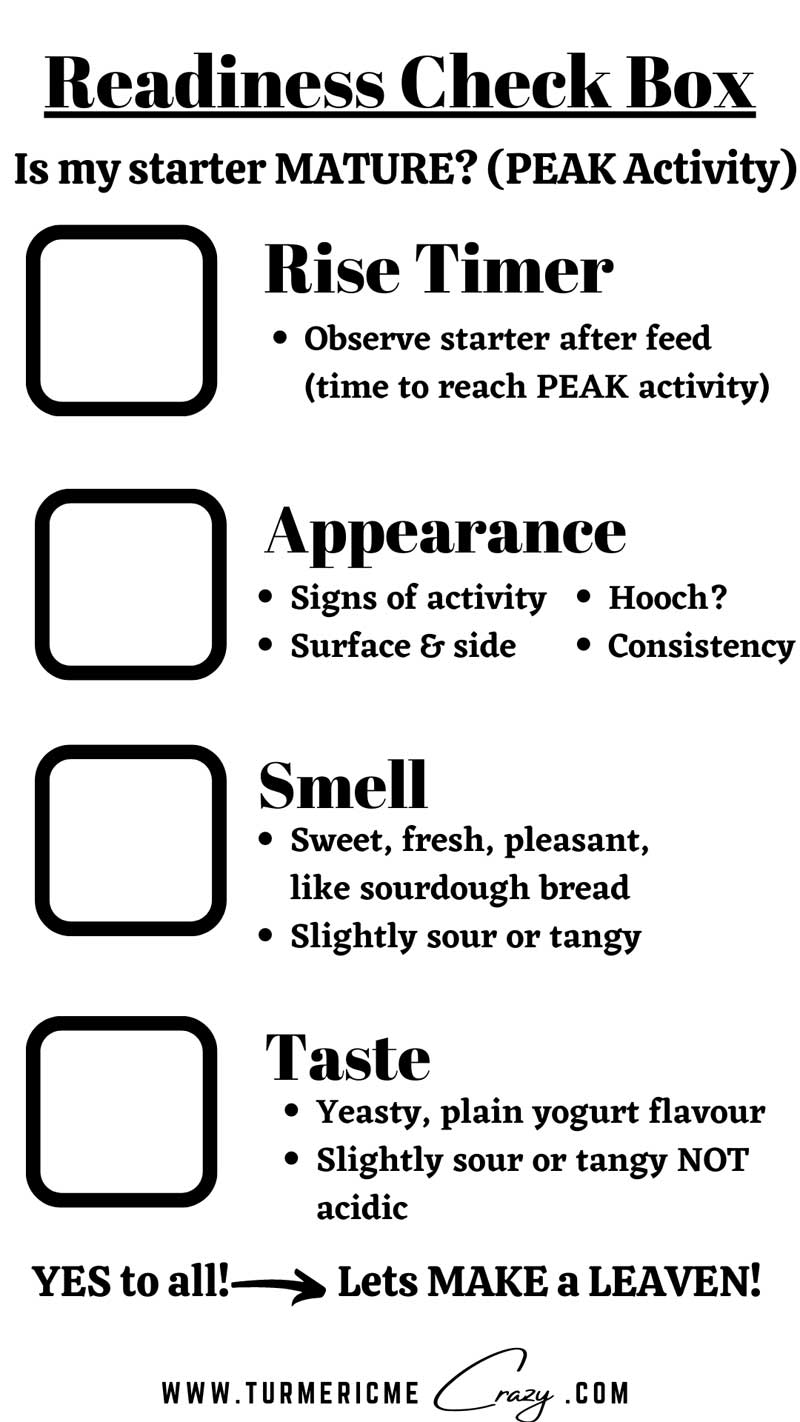
* Remember if you are using a sorghum flour starter you can feed it sorghum flour for this feed but it will need an additional 5-10g of water to achieve the right consistency. You can also feed ANY type of starter as above with your superfine brown rice flour!
If you’re not having much activity in your sourdough starter, please watch the below video for more tips!


I sure do hope you love this gluten free sourdough bread loaf recipe and agree that it is “just like the real thing!” If you try it, please add a comment & a rating onto the recipe below or at the bottom of the post as it helps Google recognize the recipe & my website which will help show it to more people. I’d love to see our community grow! ♡
Thank you once again for your readership & support.
Now let’s get baking!
Equipment Needed
- 1 Stand Mixer optional
- 1 Dutch Oven or Baking Stone
- 1 Banneton (6.5-8" = 16-20cm) or Soup Bowl with lint free towel
- 1 Bowl with lid or Ziplock bag fits banneton or soup bowl inside
- Parchment Paper optional
- 2 Ice cubes or spray bottle with water
- 1 small clear container with lid optional - for the sample dough
INGREDIENTS
To REACTIVATE your starter
- 75 g Sorghum Flour or Brown Rice Flour to feed your starter
- 75 g Warm Water (tepid or slightly warm to the touch) filtered or sat on counter 24 hours
- 15 g Gluten Free Sourdough Starter can be cold or room temp
For the LEAVEN
- 150 g Active Gluten Free Sourdough Starter @ PEAK see post for details
- 60 g Brown Rice Flour superfine (or ground as fine as possible)
- 90 g Warm Water (tepid or slightly warm to the touch) filtered or sat on counter 24 hours
For the SOAKER
- 55 g Sorghum Flour
- 50 g Brown Rice Flour superfine (or ground as fine as possible)
- 65 g White Rice Flour
- 200 g Warm Water (tepid or slightly warm to the touch) filtered or sat on counter 24 hours
For the GEL
- 100 g Aquafaba (or water) see post for details
- 30 g Olive Oil (Extra Virgin or water - optional, see post for details)
- 18 g Apple Cider Vinegar
- 16 g Pure Maple Syrup
- 9 g Kosher Salt or Sea Salt
- 20 g Psyllium Husk (whole)
For the STARCHES
- 55 g Tapioca Flour (aka Starch)
- 90 g Potato Starch can sub with arrowroot powder
INSTRUCTIONS
REACTIVATE STARTER - EVENING BEFORE YOU BAKE
- Feed your gluten free starter (either cold from refrigerator or room temp) a ratio of 1:5:5. Discard all but 15g of starter. Feed 75g brown rice flour (or sorghum flour), 75g water (may need a few more grams if feeding sorghum flour - ensure it passes the jiggle test). Ensure you keep more starter to replenish! Either set aside 10-20g of starter to replenish it now, or replenish later while you mix your leaven. See post for details.
- Leave fed starter in a warm place (near ideal temp 24°C or 75°F) until it reaches peak activity (usually 8-12 hours after feed) (see post for more details on how to tell when starter peaks).
MIX LEAVEN - when STARTER reaches PEAK activity (Bake day A.M.)
- Mix peaked starter (active), water & brown rice flour until well incorporated. This is your LEAVEN (aka preferment or active starter) that will be used to leaven (rise) the dough.
- Leave leaven in a warm place (near ideal temp 24°C or 75°F) until it reaches peak activity (see post for more details on how to tell when leaven peaks). Usually this will take between 2-4 hours.
MIX SOAKER & GEL
- After mixing leaven. Sift flours together & mix together all ingredients for soaker (I like to mix in the bowl of my stand mixer). Set aside in a warm place.
- Mix your gel. Mix all ingredients in the gel together & set aside.
ADD STARCHES & MIX DOUGH - when LEAVEN reaches PEAK activity (2-4 hours after mixing)
- Add peaked leaven, gel & sifted starches to your soaker (in the bowl of a stand mixer). Mix on low-medium for 2 mins until combined. Then increase speed to medium-high for another 5-10 mins until dough comes together nicely.
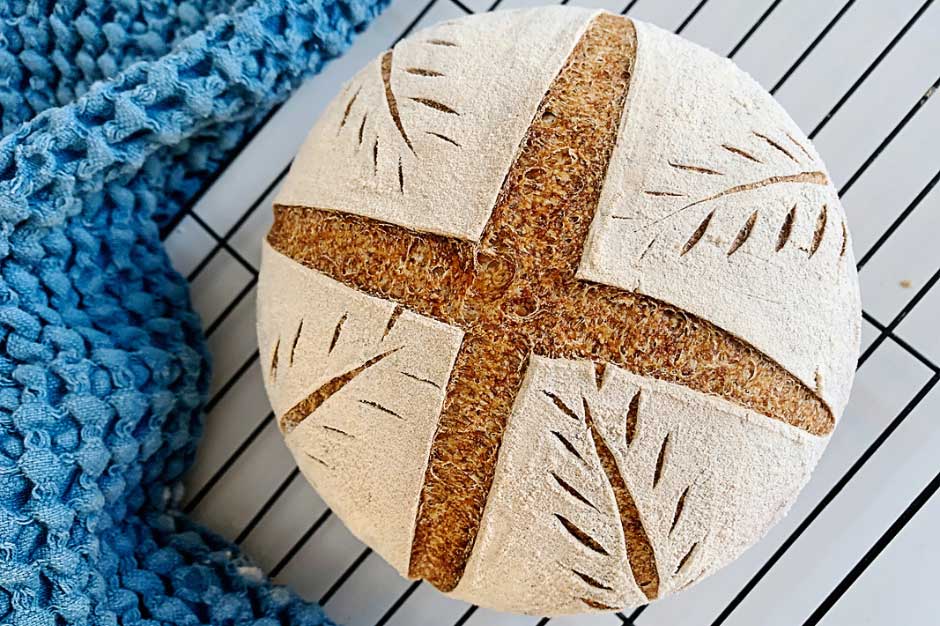
SHAPE DOUGH & PLACE INTO BANNETON OR BOWL
- Very lightly dust countertop with brown rice flour. Use a spatula or a bench scaper to make a dough ball & then transfer to countertop. Gently shape dough into a ball ensuring to close all seams. Remove a small piece of dough for your sample (see post & video for more details).
- Dust your banneton (or soup bowl lined with towel) generously with brown rice flour. Gently flip dough into banneton or soup bowl top side down. Place banneton or bowl into an airtight container or ziplock bag.
REST & CHILL
- Bulk ferment your dough (aka REST) covered for about 2 hours in a warm place. See post for list of signs that your dough is finished its "REST" time.
- CHILL the dough in refrigerator for 30mins (if baking same day) or overnight if you wish to bake the next morning. See post & video for details.
- BAKING TODAY - PREHEAT OVEN with dutch oven or baking stone inside, to 475°F (246°C) convection setting, while dough is chilling for 30 mins. No convection? Increase temp (500°F or 260°C) & or increase bake time slightly.
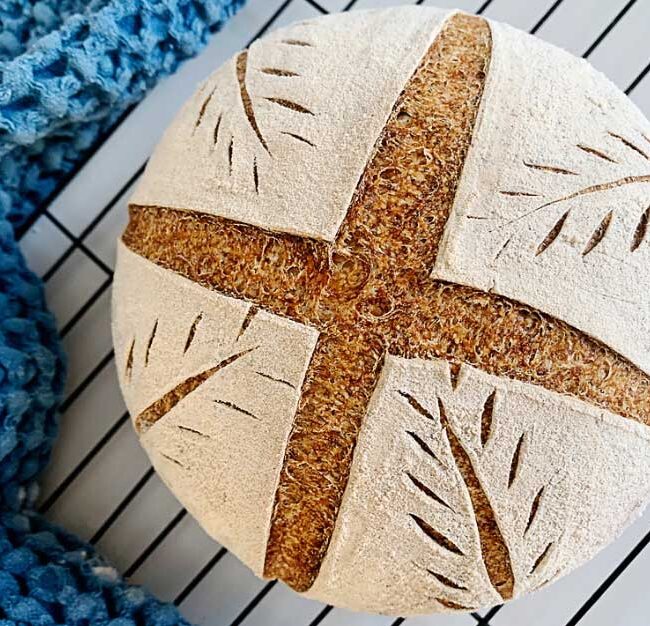
SCORE & BAKE
- Once oven has preheated for 30 mins, remove dough from refrigerator. Use parchment paper to gently flip dough out and onto countertop (top of loaf now facing up).
- Spray loaf with a little water (optional) then dust generously with brown rice flour. Score loaf at a 45° angle to the surface. See video for more details. Remember to score your sample too!
- Gently lift dough into the dutch oven, cover & place on center rack. TURN OVEN DOWN to convection 450°F (232°C) & BAKE covered for 45 mins (as little as 35 mins for a softer crumb & crust). No convection (475°F or 246°C).
- Bake your sample dough on a baking stone or tray for about 15-20mins. Remove, cool for 10 mins, slice and enjoy!
- After 45 mins, uncover dutch oven, turn dutch oven 180° & bake for another 35-45 mins uncovered.
COOL THEN ENJOY
- Make sure to let your beautiful artisan loaf cool for at least 2-3 hours before cutting into it. The gluten free sourdough needs to completely cool in order to set fully.
Video
Notes
- Stand mixer is very useful for this recipe but not essential. You can mix by hand but just make sure to mix well until ALL the ingredients are well incorporated & dough comes together nicely (10-15mins).
- This gluten free sourdough is best slightly warm. I always give mine a slight toasting and it tastes like it came directly out of the oven!
- HOW DO I MAKE THIS TOTALLY RICE FREE?
- You can substitute the white rice flour in this recipe very easily. It calls for a very small amount and switching it out will not affect it very much. You can either just increase the amounts of sorghum or cassava. Or totally substitute 1:1 for any of the following:
- Millet Flour
- Cassava Flour
- Oat Flour
- Tapioca Flour (aka Tapioca Starch)
- You can substitute the white rice flour in this recipe very easily. It calls for a very small amount and switching it out will not affect it very much. You can either just increase the amounts of sorghum or cassava. Or totally substitute 1:1 for any of the following:
-
CAN I FREEZE MY LOAF?
- Absolutely! As with most sourdough bread, gluten free sourdough is best in the 1st 2 days and can be left at room temperature in a brown paper bag or wrapped in a towel. However, if you won't consume it within 2 days please do slice it up & freeze it! TO FREEZE: Once fully cooled, slice the loaf and wrap each slice in either parchment or plastic wrap before placing in an airtight container and freezing. This will prevent freezer burn & should stay fresh for a good 2 weeks or longer! TO THAW: Simply take individual slices out of freezer and thaw on counter overnight. I find it best to toast them slightly to gain the best taste & texture. You can also pop them directly into the toaster from the freezer, you'll likely need to toast it twice!
Nutrition
- \n
- MORE LEAVEN <\/strong>= more sour dough & faster bulk fermentation<\/li>\n<\/ul>\n
<\/p>\n
<\/p>\n
- \n
- LESS LEAVEN<\/strong> = more mild sour flavour to dough & slower fermentation<\/li>\n<\/ul>"}},{"@type":"Question","name":"HOW LONG UNTIL I CAN BAKE MY GLUTEN FREE SOURDOUGH?","acceptedAnswer":{"@type":"Answer","text":"
Time to mix our LEAVEN (aka preferment). Once your starter has reached its PEAK RISE<\/strong>, mix your leaven & let it do its magic! It will take a good 2-4 hours (more or less depending on the temp of the environment & how much starter is in the leaven) for the leaven to reach its PEAK and be ready to mix your dough!<\/p>"}},{"@type":"Question","name":"WHAT AFFECTS THE TIME IT TAKES THE LEAVEN TO PEAK:","acceptedAnswer":{"@type":"Answer","text":"
- \n
- Temperature of your starters environment? WARMER = LESS TIME, COLDER = MORE TIME<\/li>\n<\/ul>\n
<\/p>\n
<\/p>\n
- \n
- How has your starter been responding to the previous feeds & ratios? This will give you a hint to how long it will take your leaven to reach its peak rise. The leaven is 1\/2 starter : 1\/2 feed so it will reach its peak quicker than our feeds that were 1:1:1 ratio!<\/li>\n<\/ul>\n
<\/p>\n
<\/p>\n
- \n
- What is your starters appearance? Rise? Surface appearance? Bubbles? This will help you know what phase of the life cycle your starter is at & how long it will take to peak. See my post on how to make a sourdough starter<\/a><\/strong> for more details.<\/li>\n<\/ul>"}},{"@type":"Question","name":"HOW DO I MAKE THIS TOTALLY RICE FREE?","acceptedAnswer":{"@type":"Answer","text":"
You can substitute the white rice flour in this recipe very easily. It calls for a very small amount and switching it out will not affect it very much. You can either just increase the amounts of sorghum or cassava. Or totally substitute 1:1 for any of the following:<\/p>\n
- \n
- Millet Flour<\/li>\n
- Cassava Flour<\/li>\n
- Oat Flour<\/li>\n
- Tapioca Flour (aka Tapioca Starch)<\/li>\n
- \u00a0<\/li>\n<\/ol>"}}]}
- What is your starters appearance? Rise? Surface appearance? Bubbles? This will help you know what phase of the life cycle your starter is at & how long it will take to peak. See my post on how to make a sourdough starter<\/a><\/strong> for more details.<\/li>\n<\/ul>"}},{"@type":"Question","name":"HOW DO I MAKE THIS TOTALLY RICE FREE?","acceptedAnswer":{"@type":"Answer","text":"
- How has your starter been responding to the previous feeds & ratios? This will give you a hint to how long it will take your leaven to reach its peak rise. The leaven is 1\/2 starter : 1\/2 feed so it will reach its peak quicker than our feeds that were 1:1:1 ratio!<\/li>\n<\/ul>\n
- Temperature of your starters environment? WARMER = LESS TIME, COLDER = MORE TIME<\/li>\n<\/ul>\n
- LESS LEAVEN<\/strong> = more mild sour flavour to dough & slower fermentation<\/li>\n<\/ul>"}},{"@type":"Question","name":"HOW LONG UNTIL I CAN BAKE MY GLUTEN FREE SOURDOUGH?","acceptedAnswer":{"@type":"Answer","text":"
I sure do hope you love this gluten free sourdough bread loaf recipe and agree that it is “just like the real thing!” If you try it, please add a comment & a rating onto the recipe below or at the bottom of the post as it helps Google recognize the recipe & my website which will help show it to more people. I’d love to see our community grow! ♡
Thank you once again for your readership & support.
Now let’s get baking!
Equipment Needed
- 1 Stand Mixer optional
- 1 Dutch Oven or Baking Stone
- 1 Banneton (6.5-8" = 16-20cm) or Soup Bowl with lint free towel
- 1 Bowl with lid or Ziplock bag fits banneton or soup bowl inside
- Parchment Paper optional
- 2 Ice cubes or spray bottle with water
- 1 small clear container with lid optional - for the sample dough
INGREDIENTS
To REACTIVATE your starter
- 75 g Sorghum Flour or Brown Rice Flour to feed your starter
- 75 g Warm Water (tepid or slightly warm to the touch) filtered or sat on counter 24 hours
- 15 g Gluten Free Sourdough Starter can be cold or room temp
For the LEAVEN
- 150 g Active Gluten Free Sourdough Starter @ PEAK see post for details
- 60 g Brown Rice Flour superfine (or ground as fine as possible)
- 90 g Warm Water (tepid or slightly warm to the touch) filtered or sat on counter 24 hours
For the SOAKER
- 55 g Sorghum Flour
- 50 g Brown Rice Flour superfine (or ground as fine as possible)
- 65 g White Rice Flour
- 200 g Warm Water (tepid or slightly warm to the touch) filtered or sat on counter 24 hours
For the GEL
- 100 g Aquafaba (or water) see post for details
- 30 g Olive Oil (Extra Virgin or water - optional, see post for details)
- 18 g Apple Cider Vinegar
- 16 g Pure Maple Syrup
- 9 g Kosher Salt or Sea Salt
- 20 g Psyllium Husk (whole)
For the STARCHES
- 55 g Tapioca Flour (aka Starch)
- 90 g Potato Starch can sub with arrowroot powder
INSTRUCTIONS
REACTIVATE STARTER - EVENING BEFORE YOU BAKE
- Feed your gluten free starter (either cold from refrigerator or room temp) a ratio of 1:5:5. Discard all but 15g of starter. Feed 75g brown rice flour (or sorghum flour), 75g water (may need a few more grams if feeding sorghum flour - ensure it passes the jiggle test). Ensure you keep more starter to replenish! Either set aside 10-20g of starter to replenish it now, or replenish later while you mix your leaven. See post for details.
- Leave fed starter in a warm place (near ideal temp 24°C or 75°F) until it reaches peak activity (usually 8-12 hours after feed) (see post for more details on how to tell when starter peaks).
MIX LEAVEN - when STARTER reaches PEAK activity (Bake day A.M.)
- Mix peaked starter (active), water & brown rice flour until well incorporated. This is your LEAVEN (aka preferment or active starter) that will be used to leaven (rise) the dough.
- Leave leaven in a warm place (near ideal temp 24°C or 75°F) until it reaches peak activity (see post for more details on how to tell when leaven peaks). Usually this will take between 2-4 hours.
MIX SOAKER & GEL
- After mixing leaven. Sift flours together & mix together all ingredients for soaker (I like to mix in the bowl of my stand mixer). Set aside in a warm place.
- Mix your gel. Mix all ingredients in the gel together & set aside.
ADD STARCHES & MIX DOUGH - when LEAVEN reaches PEAK activity (2-4 hours after mixing)
- Add peaked leaven, gel & sifted starches to your soaker (in the bowl of a stand mixer). Mix on low-medium for 2 mins until combined. Then increase speed to medium-high for another 5-10 mins until dough comes together nicely.
SHAPE DOUGH & PLACE INTO BANNETON OR BOWL
- Very lightly dust countertop with brown rice flour. Use a spatula or a bench scaper to make a dough ball & then transfer to countertop. Gently shape dough into a ball ensuring to close all seams. Remove a small piece of dough for your sample (see post & video for more details).
- Dust your banneton (or soup bowl lined with towel) generously with brown rice flour. Gently flip dough into banneton or soup bowl top side down. Place banneton or bowl into an airtight container or ziplock bag.
REST & CHILL
- Bulk ferment your dough (aka REST) covered for about 2 hours in a warm place. See post for list of signs that your dough is finished its "REST" time.
- CHILL the dough in refrigerator for 30mins (if baking same day) or overnight if you wish to bake the next morning. See post & video for details.
- BAKING TODAY - PREHEAT OVEN with dutch oven or baking stone inside, to 475°F (246°C) convection setting, while dough is chilling for 30 mins. No convection? Increase temp (500°F or 260°C) & or increase bake time slightly.
SCORE & BAKE
- Once oven has preheated for 30 mins, remove dough from refrigerator. Use parchment paper to gently flip dough out and onto countertop (top of loaf now facing up).
- Spray loaf with a little water (optional) then dust generously with brown rice flour. Score loaf at a 45° angle to the surface. See video for more details. Remember to score your sample too!
- Gently lift dough into the dutch oven, cover & place on center rack. TURN OVEN DOWN to convection 450°F (232°C) & BAKE covered for 45 mins (as little as 35 mins for a softer crumb & crust). No convection (475°F or 246°C).
- Bake your sample dough on a baking stone or tray for about 15-20mins. Remove, cool for 10 mins, slice and enjoy!
- After 45 mins, uncover dutch oven, turn dutch oven 180° & bake for another 35-45 mins uncovered.
COOL THEN ENJOY
- Make sure to let your beautiful artisan loaf cool for at least 2-3 hours before cutting into it. The gluten free sourdough needs to completely cool in order to set fully.
Video
Notes
- Stand mixer is very useful for this recipe but not essential. You can mix by hand but just make sure to mix well until ALL the ingredients are well incorporated & dough comes together nicely (10-15mins).
- This gluten free sourdough is best slightly warm. I always give mine a slight toasting and it tastes like it came directly out of the oven!
- HOW DO I MAKE THIS TOTALLY RICE FREE?
- You can substitute the white rice flour in this recipe very easily. It calls for a very small amount and switching it out will not affect it very much. You can either just increase the amounts of sorghum or cassava. Or totally substitute 1:1 for any of the following:
- Millet Flour
- Cassava Flour
- Oat Flour
- Tapioca Flour (aka Tapioca Starch)
- You can substitute the white rice flour in this recipe very easily. It calls for a very small amount and switching it out will not affect it very much. You can either just increase the amounts of sorghum or cassava. Or totally substitute 1:1 for any of the following:
-
CAN I FREEZE MY LOAF?
- Absolutely! As with most sourdough bread, gluten free sourdough is best in the 1st 2 days and can be left at room temperature in a brown paper bag or wrapped in a towel. However, if you won't consume it within 2 days please do slice it up & freeze it! TO FREEZE: Once fully cooled, slice the loaf and wrap each slice in either parchment or plastic wrap before placing in an airtight container and freezing. This will prevent freezer burn & should stay fresh for a good 2 weeks or longer! TO THAW: Simply take individual slices out of freezer and thaw on counter overnight. I find it best to toast them slightly to gain the best taste & texture. You can also pop them directly into the toaster from the freezer, you'll likely need to toast it twice!