


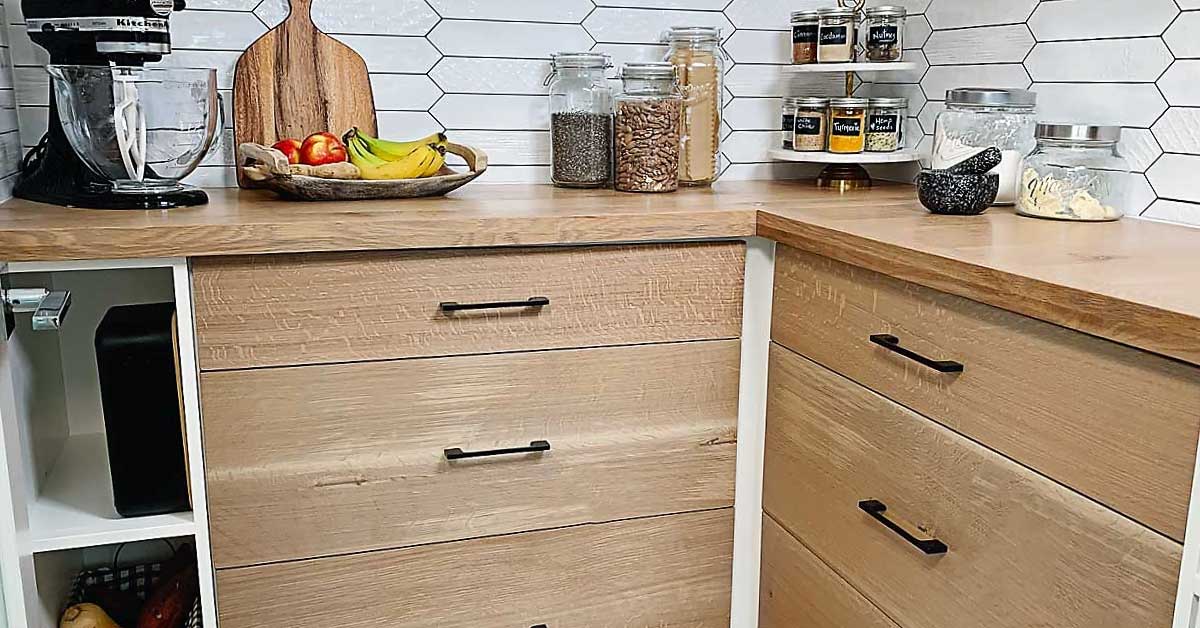


We’re so excited to share with you how we built our gorgeous wood countertop that looks like it is inches thick! With our simple method you to can build a faux thick wood countertop that you can use in any space! Learn how “Turmeric” your pantry the perfect kitchen space!
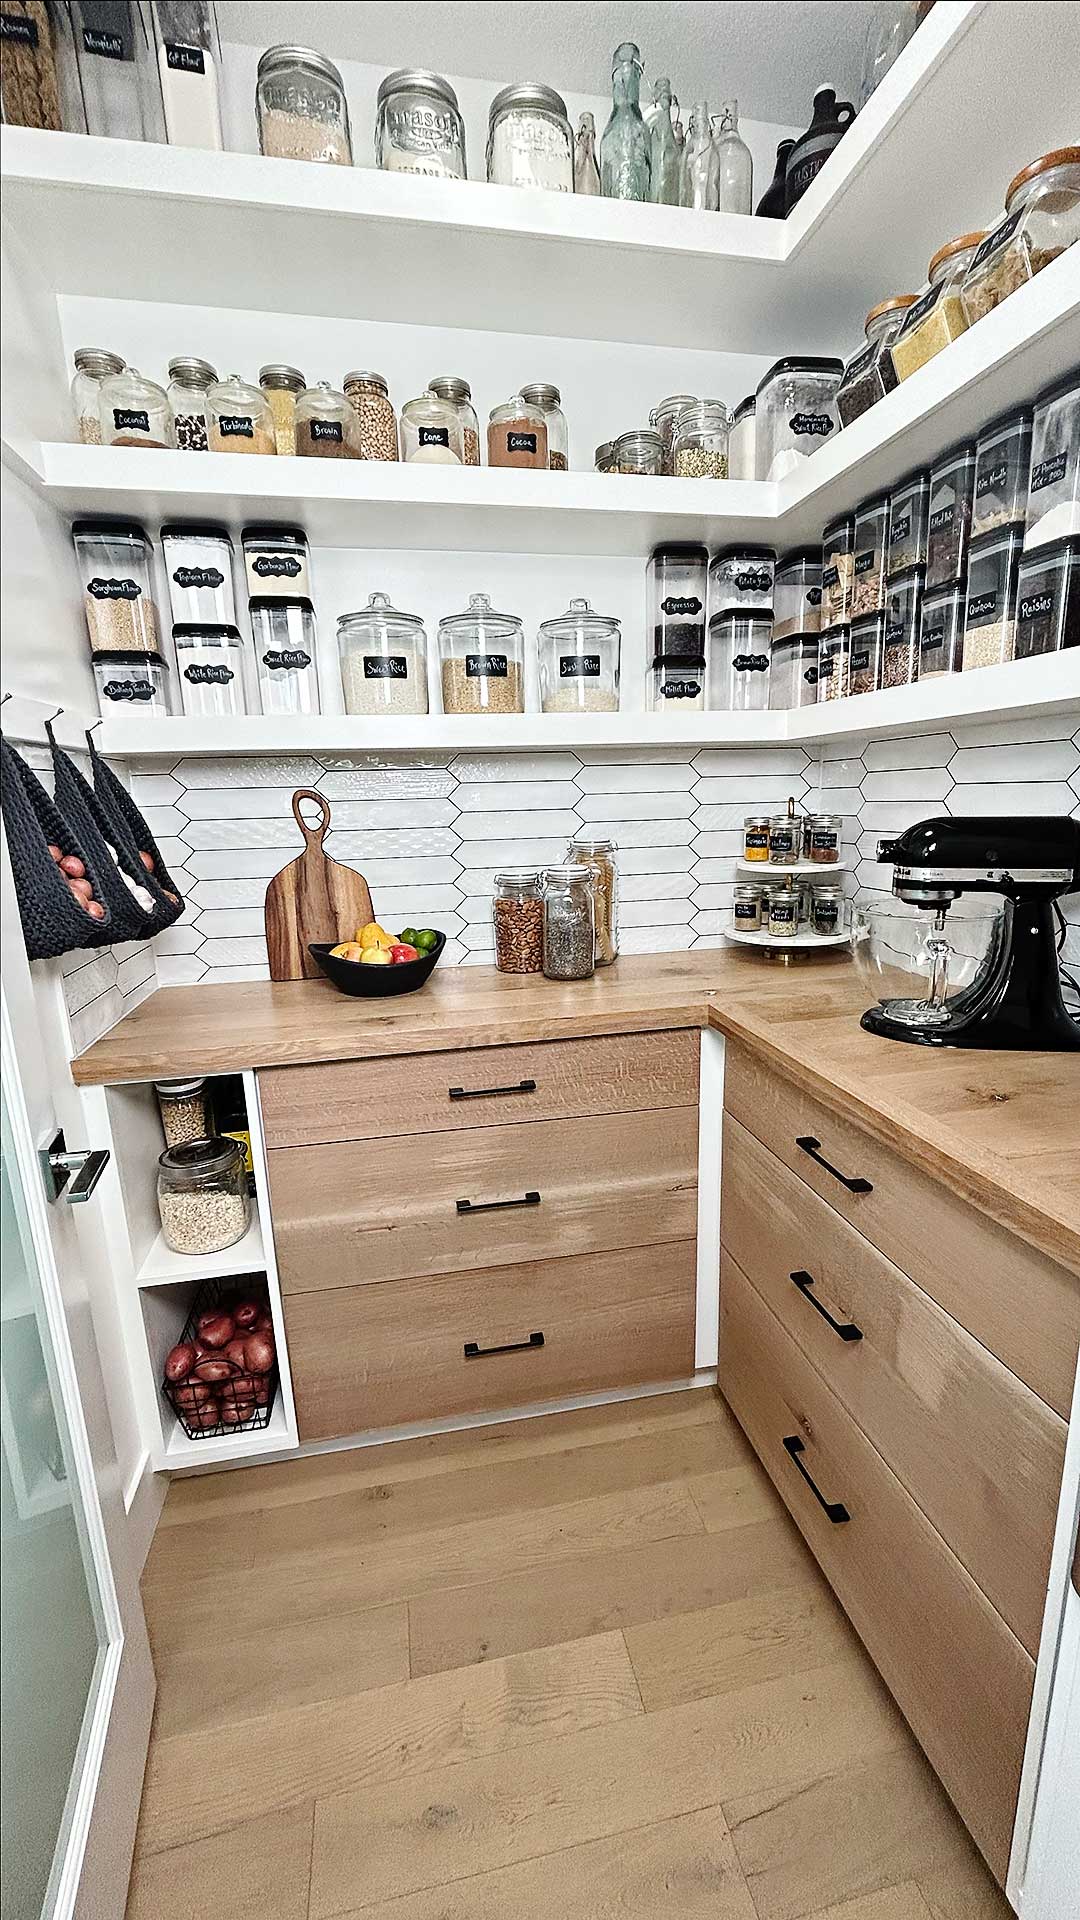
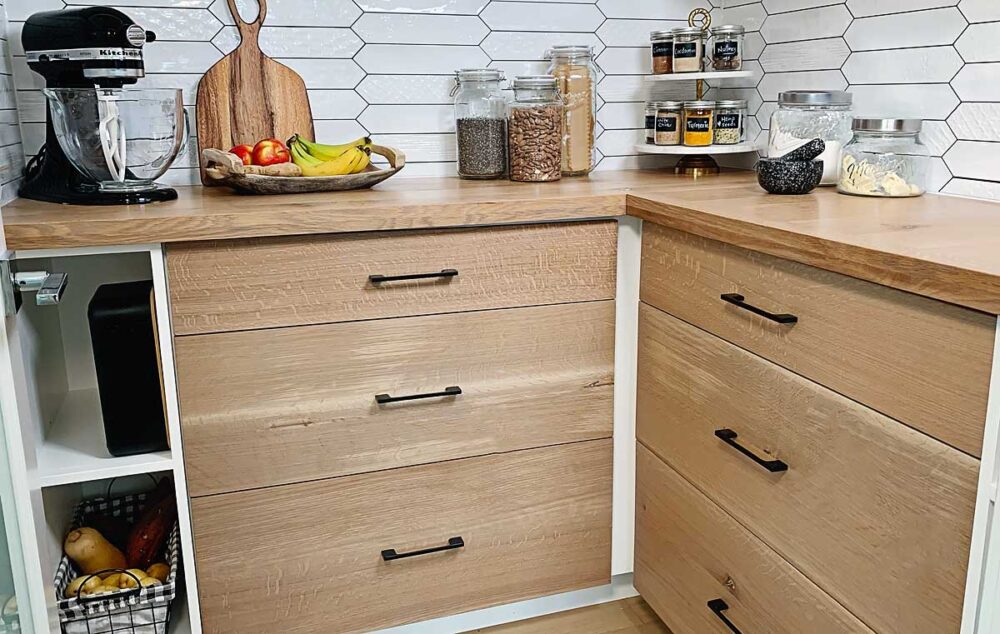
I can’t say enough how much I adore our wood countertop! We had previously built our entire kitchen island with a wood countertop and I’ve missed it dearly in our new home. So when we decided to build a Butler’s Style Pantry I just knew it had to have a wooden countertop.
Some may worry about using wood as it may not hold up over time. However, in my experience, if well protected and cared for your wood countertop will look just as good if not better than it’s stone counterpart.
Follow our step-by-step video guide on how to build a wood countertop. Full written instructions are below or click here!
You’ll need to make a few decisions to design and plan your countertop properly. Planning is truly one of the most important steps in building a wooden countertop!
1. Wood Type
Choosing the best type of wood for a wooden countertop is crucial, as it will affect both the aesthetic appeal and the durability of your countertop. The best type of wood for your wooden countertop will depend on your priorities, whether it's durability, appearance, cost, or maintenance. Carefully weigh these factors to choose the wood that best suits your needs and preferences.
Here are some key factors to consider when selecting the right wood for your project:
Durability: The countertop is a high-traffic area, so you'll want a wood that can withstand the daily wear and tear. Some hardwoods are known for their durability and resistance to moisture and staining. Oak, maple, cherry, and walnut are popular choices due to their hardness and durability.
Appearance: The aesthetic aspect is equally important. Different woods offer varying colours, grain patterns, and textures. Consider the overall look of your kitchen and how the wood will complement your cabinetry, flooring, and décor. For example, oak has a prominent grain pattern, while cherry offers a rich, reddish hue, and walnut a rich darker tone.
Sun Exposure: Will your countertop be exposed to direct sunlight? If so, make sure to consider this as sun exposure can change the colour of your wood over time. Maple will tend to yellow, while Cherry will deepen to an orange-red tone.
Maintenance: Some woods are easier to maintain than others. Exotic hardwoods like teak are naturally resistant to moisture and require less maintenance. Lighter-coloured woods may show fewer scratches and dents, while darker woods may hide minor imperfections more effectively.
Cost: The cost of the wood can vary significantly. Some exotic or rare woods can be expensive, while domestic hardwoods are often more budget-friendly. Consider your budget when selecting the wood for your countertop.
Stain Resistance: Wood countertops are susceptible to stains from spills and cooking. Some woods, like maple, have a tight grain pattern that makes it more resistant to stains, while others, like pine, are more porous and may require more maintenance.
Hardness: Hardness is measured on the Janka scale, and it indicates a wood's resistance to wear and denting. Harder woods tend to be more durable. Woods like maple, cherry, and oak are relatively hard and are good choices for countertops.
Finish: The type of finish you plan to use can affect your wood choice. Some woods may respond better to certain finishes. For example, woods like cherry and walnut often look stunning with a natural oil finish, while oak and maple can be finished with various options, including our favourite Osmo Polyx-Oil.
Availability: Consider the availability of the wood in your region. Some exotic woods may be challenging to find locally and can be expensive to source. Domestic hardwoods are often more readily available.
Local Climate: Take into account the humidity and climate conditions in your area. Some woods may expand or contract with fluctuations in humidity. Ensure the wood you choose is suitable for your local climate.
Personal Preferences: Ultimately, your personal preferences play a significant role in the decision. You may have a particular wood species that you adore, or you might prioritize a specific color or grain pattern.
Visit a Lumberyard: It's a good practice to visit a local lumberyard or wood supplier to see and touch the wood samples in person. This will help you make an informed decision based on how the wood feels and looks.
2. Planning & Measurements
All of the planning and measurements have already been made in the Planning video (Part 2a. Sizing & Dimensioning).
- Measure the dimensions of your countertop space accurately.
- Left Side Countertop: CLL x CWL
- Right Side Countertop: CWR x CLR
- Calculate the number of boards needed based on your measurements.
- decide orientation of boards (consider whether you want edge vs face vs end grain exposed)
- calculate number of boards & width of each to achieve your exact measurements (see 1:57 mins into video for more details)
- Decide on the desired thickness or faux thickness of your countertop
- want edge grain to match on both sides
- need to add a finishing piece to achieve 1 1/2# faux thickness
- Double check measurements using a "Scrap Dummie" Wood (see video for details)
- cut to exact length CLL.
- plane top edge on one side & bottom on other.
- test measurements without damaging walls.
2. prepare the raw wood boards
You can have your wood boards jointed and planed at the lumber store if you don’t yet have a jointer or planer.
- Choose high-quality hardwood boards with straight grains and minimal knots. Remember to plane & joint an additional wood board that you will use to create the faux front later.
- Create Square Edges & Equal Thickness:
- Joint 2 sides:
- use a jointer to joint 1 face + 1 side
- Plane both faces:
- use a planer (with sharp blades) to plane to desired thickness
- Check all boards are equal thickness using a thickness gauge
- Cut the unfinished edge to square ALL edges
- use a table saw to square the last edge & cut to exact width
- Joint 2 sides:
- Cut All Boards to length
- ensure add 3 or 4″ = room for error & allows to cut an exact fit when finished
- Remember to Cut, Plane & Joint an extra Board for the Faux Front
3. Plan Order & Orientation of Wood Boards
- To create the desired look, take some time to play around with the order of the boards. Paying close attention to the wood grain, colour variations & imperfections to decide which boards look best where.
- Dry fit both sides of the corner countertop to ensure you like to final look.
4. Biscuit joint & glue the wood boards
Biscuit jointing is our favourite method of joining the boards, however, you could use a dowel method or any method you prefer. Using the biscuits help to prevent slippage while glueing your boards together to strengthen the joints.
- Align boards in exact order for finished look.
- Place a pencil mark on adjacent boards about every 2 feet (0.6m).
- Label the boards & draw a curvy line to help with alignment.
- Line up lines created with the centre line on the biscuit jointer & press in to create slot hole for biscuit
- creates a slot for the biscuit to fit in
- biscuits hold joint together & prevents slippage during glueing
5. GLUE AND clamp wood boards
When glueing, it is important to note that using more glue and wiping off excess is much easier and you’ll have more success than trying to use less glue. Also, make sure to act fairly quickly and within the assembly time that your glue requires.
We like to make our own wood cauls to use while clamping. We simply take straight wood boards & cover them with tuck tape on the side that the boards will sit on (see video for details).
- Place a plastic protector over your work surface to protect it from glue . Then place pipe clamps & wood cauls on top (will be used to keep boards aligned)
- Place boards on top of pipe clamps & wood cauls. Add glue along all edges to be joined & inside the biscuit joints. Add one biscuit into one side of the join. Place glue all over biscuit.
- Join boards together to make a tight join.
- Repeat until all boards are joined. Then semi-tighten your pipe clamps. Glue will just begin to ooze out of joints.
- Add additional cauls as a cross brace to help ensure a flat surface & prevent warping. Clamp to secure (we use cabinet clamps). It is always better to over clamp and use to many clamps than to little!
- Fully tighten all of the clamps. Glue should ooze out slightly between the boards. Make sure to double check that the surface is completely straight.
- Promptly remove excess glue using a scrapper. This will greatly decrease sanding required later.
- Remove glue from the bottom as well. This will ensure you have a flat surface.
- Fill any holes or knots with wood filler if desired. Then promptly & gently remove excess using a scrapper. Avoid aggressive angles with your scraper so you don’t scratch the wood. This will greatly decrease sanding required later.
- Let glue dry according to your specific glue’s clamp time.
6. Build the faux front for wood countertop
(how to make the countertop appear really thick)
This is an awesome trick to make your countertop look thicker than it really is! You can achieve the look of really expensive thick wood without the added cost! Bonus!
You’ve already planed and jointed the raw lumber for this faux front. So now we can start the magic:
- Cut the board on the unfinished edge to the width of the faux front piece = desire overhang of your countertop (see video for more details).
- Flip countertop upside down (bottom side faces up). Add this piece to the underside of the front edge of the countertop. Ensure that the grain matches and you like to look of the two pieces next to one another from the front edge. Ideally the grain will be close in colour, size and imperfections. This will create a very seamless look!
- Glue & clamp the two pieces together. Use enough glue that it slightly oozes out the sides. Ensure that the alignment is perfectly smooth on the front edge.
- Drill the countertop faux front into place using a drill stop collar so you can set the depth of the hole to make sure it doesn’t go through the top of your countertop. Drill to the set depth into the middle of the faux piece. Then countersink the hole (this will be on the underside of the overhang of your countertop so you don’t want it to be visible at all.
- Secure with screws. Drill & secure every 12″ (30cm) or so.
7. Cut wood Countertop to Square the ends
We are not cutting countertop to the exact length yet. This is why we needed the extra 3 or 4″ minimum so that we can finish it perfectly.
- Using the table saw cut length of countertop to square the edges. Then flip it over and cut the other end to be square.
8. Add stabilizing pieces to underside
Since the faux front adds a little height, we used 1/2″ plywood to raise the underside to equal the faux front. This allows for a flat surface to secure the countertop to the base cabinet frame.
- Cut 1/2″ plywood = faux front. Cut 3 pieces to create a U shape.
- Mark about every 12″ (30cm) or so and pre-drill holes, countersink (so screws don’t interfere with countertop), then secure with screws.
9. Cut wood countertop to exact length
Using your “scrap dummie” wood you measured earlier in Step 1 to help get an exact measurement.
- Using a straight edge on one end, measure and mark exactly where the dummie wood hits.
- Use a carpenters square to extend that line to the other side of the wood.
- To prevent tear out (where the blade comes up and tears some of the wood fibres away leaving a tooth like edge) we added duct tape along the cut line on the top of the countertop = “good side”.
- Use the table saw to cut the straight edge (with the underside of the countertop facing up), making sure to account for the thickness of the blade.
10. Finishing the wood countertop
The easiest way to sand the tops and edges of your countertop is with a belt sander.
- Ensure to move the sander with the grain of the wood.
- Start with 120 grit, then 150 grit and lastly 180 grit.
To prevent bruising the wall when you’re installing your countertop use a hand planer and sandpaper.
⭐️ Remember if you are doing a corner countertop, need to decide what your join will look like. If you sand the edges where the two sides meet, it will leave a small visible seam. If you want where the two sides meet to be perfectly flush and joined, don’t sand the edges where they meet.
- Gently plane down the edges and the corners to remove any sharp edges.
- Sand the top and bottom edge of the front of the countertop.
- Gently sand all edges and corners
⭐️ Finally, we use fine steel wool, rubbing along the grain, all over the countertop to achieve a super smooth finish!
11. Install the wood countertop
Very slowly and gently slide your countertop in, making sure it is square to the edges. DO NOT USE FORCE.
It may seem like it is not going to fit. Don’t worry, we have a trick to magically expand your walls!
⭐️ Our Trick to MAGICALLY EXPAND WALLS:
If you gently push your countertop in and you are left with a gap between the wall and countertop, use this trick to magically (temporarily) expand your walls!
- Place a piece of wood on either side of your walls.
- Place a clamp along the countertop pressing on the pieces of wood at either end.
- Very gently and slowly, tighten the clamp slightly to magically expand your wall!
- Walls will spread apart ever so slightly, just enough that you can gently push your countertop in flat against the wall. Or at least close enough that you can cover the gap left with a bead of silicone or with a tile if you’re going to be tiling your wall (see our how to video for absolute beginners…coming soon)
12. Making a corner countertop?
If you’re not building a corner countertop, you can skip ahead to Step 16.
Building a corner countertop: Now, build the right side of your countertop. You’ve already planed, jointed and prepared your wood.
- Biscuit joint – in same manner as above (see video).
- Glue & clamp boards together as above. There will be many more joins on this side if you chose the same grain orientation we did. See our how to video for our very useful tips and tricks.
- Cut countertop to square ends. Once glue has dried, use a circular saw to create a square edge on one side. Then the table saw to square the other side.
13. Adding Finishing Pieces to right side of countertop
It is always more appealing to have the same type of grain exposed on the front edge of the countertop. This creates a seamless look to the corner face and make the countertop look WAY thicker than it actually is.
- Add a piece to the front of right countertop so that edge grain is exposed.
- Use the extra piece that we cut off (of the faux front piece) from the left side of the countertop.
- Width = minimum width of desired overhang. We like to double that to give a thicker piece and make it more visually appealing.
- Biscuit joint, glue, clamp, use wood filler if needed & remove excess glue as above.
- Finish – sanding with belt sander the top and edges (be careful as this side of the countertop has 2 different directions of grain).
- Cut with table saw to the exact width of the countertop.
14. Adding Faux Front & Stabilizing Pieces
- Add the faux front piece in the same manner as above.
- Add the stabilizing pieces in the same manner as above with just adding on piece in the front and one in the back (see video).
- Measure the finished measurement now that the left side of the countertop is in. Then cut the right countertop to its final dimensions.
15. Finish & Install the Right Countertop
- Use hand planer & sand paper and soften up all the edges as we did above.
- To install: slide the countertop in on an angle, with the left side going in first.
- If it doesn’t fit perfectly: use our magic expanding wall trick from above.
- If needed use a hand plane to shave off a little bit of the edge where needed. Or can use a wood shim or a coin if needed to slightly lift where needed.
16. Securing the wood Countertop
To secure the countertop to the base cabinet:
- Pre-drill holes between the base cabinet frame and the extra stabilizing pieces we added to underside of countertop (be mindful of depth so as not to puncture the countertop).
- Secure with screws. Have someone stand on top of countertop to stabilize helps.
17. Protect your gorgeous Wood Countertop
Now it is time to add a finish to your beautiful countertop! We definitely have a favourite we will share but the choice is up to you.
You can chose a natural mat or sheen finish or a coloured stain. The glossier the finish, the more water protection the stain will provide.
We wanted to neutralize some of the natural yellow in quarter cut white oak so we chose to use a grey stain as well as a protective oil.
Our favourites:
Protectant: Osmo = Polyx-Oil Clear Matte Finish (3031)
Grey Stain: Osmo Wood Wax Finish Silk Grey 3119
How to Apply (see video for details):
- Apply 1st coat immediately after countertop has been secured. This 1st coat seals the wood and will protect it from any accidental liquid spills.
- Apply 2nd coat once completely dry. If using a coloured stain use it now.
- Add as many coats as you like of the coloured stain until you reach the desired look.
- To finish: apply 3 or 4 coats of Osmo Polyx-Oil in order to protect your countertop from any water spills or food stains (be mindful of re-coating times).

Watch the entire Butlers style
pantry renovation

Still don’t have a plan? Check out our Planning Guide. We’ve worked hard to create a printable PDF file for you to use to help guide you in making your base cabinet for to fit your specifications. There’s even a fill in the blank measurements list to help you get started. We hope you enjoy it!
Subscribe to our YouTube Channel to be notified when our next video goes live!
We are always working hard to get new DIY videos ready for you! Please check back again soon and subscribe to our blog & YouTube Channel to find out when our next videos are released.
Please support us ♥︎
If you’re enjoying our free recipes & DIY projects at TurmericMeCrazy and would like to say thank you, here’s how:
1) Buy us a bag of groceries to help support us and say thanks for all of our hard work ♡.
2) Leave us 5  reviews & positive comments on the recipe pages as well as our YouTube Channel.
3) Subscribe to our monthly updates on TurmericMeCrazy.com & to our YouTube Channel.
3) Consider using some of my affiliate links on my website to buy products or check out my favourite kitchen things links.
Your support will allow us to continue to create free content on our blog & YouTube Channel! Thank you so much in advance  . We are truly grateful for the opportunity to help others enjoy creating both in and out of the kitchen!

Want more DIY projects & delicious recipes at your fingertips?
Get updates on our latest posts, DIY projects & recipes from TurmericMeCrazy straight to your inbox!
By clicking subscribe you are consenting to receive emails from TurmericMeCrazy. I will only email you monthly with new recipes & updates. No spam I promise!