
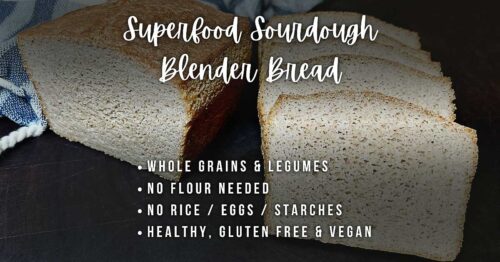

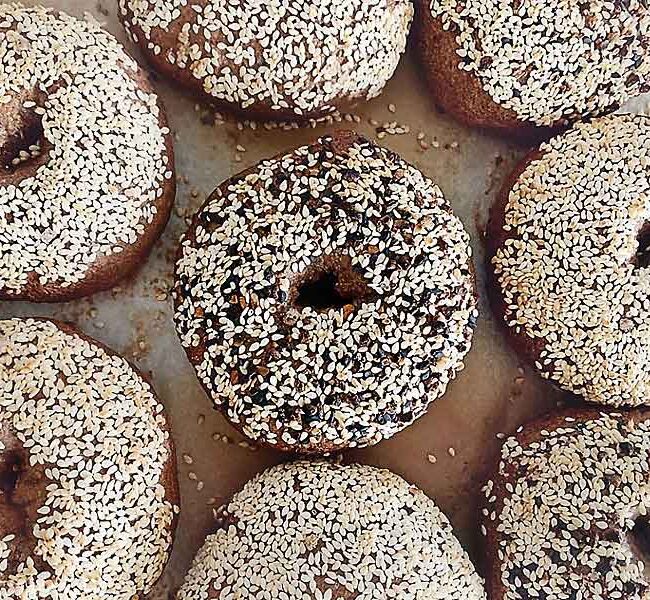


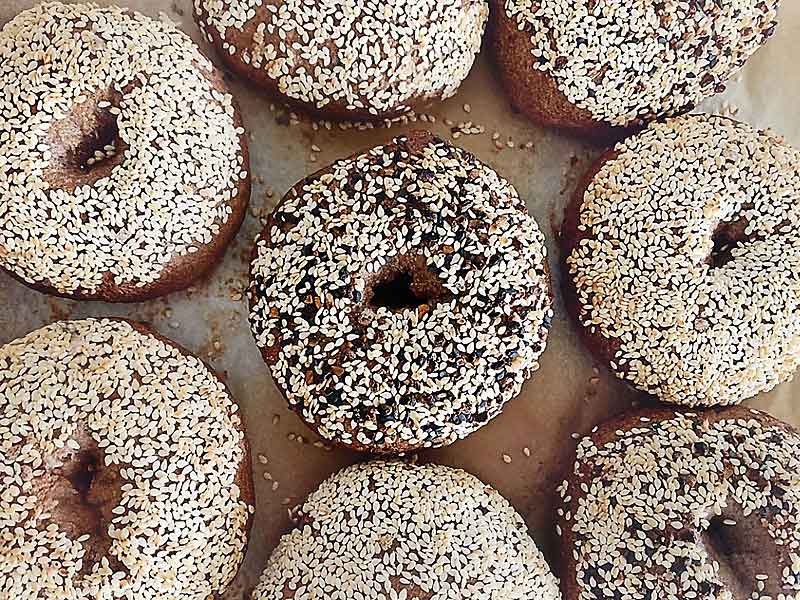
Enjoy incredibly delicious teff gluten free sourdough bagels hot from the oven on Sunday morning with this quick & easy ancient grain teff gluten free sourdough bagel recipe!

Simply mix up your dough Saturday evening with my simple recipe & when you awake Sunday morning, it’s ready to boil & bake! I wanted to make a bagel recipe that could be made in under 1 hour so you could enjoy them for breakfast Sunday morning!
I grew up making bagels with my wonderful mom and so it was really important to me that I was able to continue this tradition with my son & daughter. We also know that time is precious, especially in these busy times in our lives. So we created a teff gluten free sourdough bagel recipe that is gluten free, rice free, quick & easy to make and lives up to my moms legendary Sunday morning bagels! I hope you enjoy them as much as we do ♡.

Want to make sourdough bagels but don’t have a gluten free sourdough yet? I’ve got you! Follow along with me in my easy video series to make a gluten free sourdough starter in just 4-5 days, you can make these incredible bagels and so much more! You can make RICE-FREE sourdough starter too!
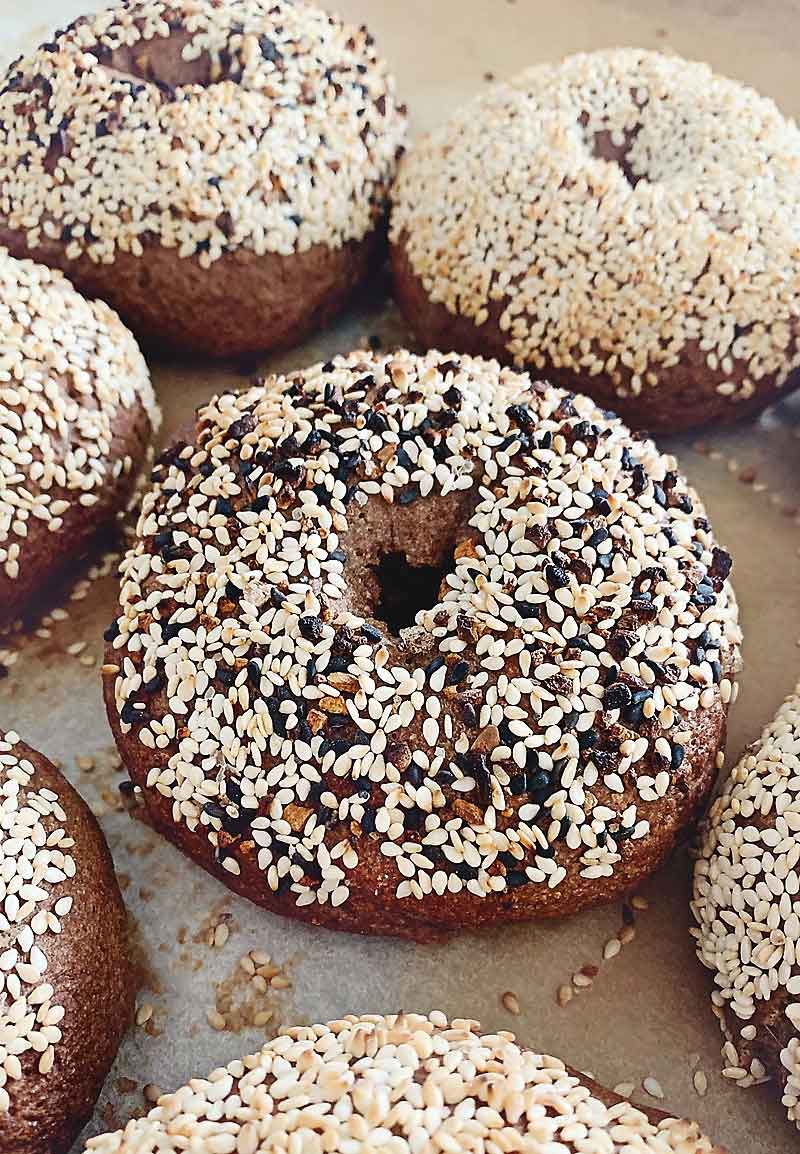
You’re going to love these Teff Gluten Free Sourdough Bagels!
The best part about these bagels is you absolutely can not tell they are gluten free. I promise! My non-gluten free family members love them! They remind me of a lovely rye bagel. These tasty gluten free sourdough bagels are traditional Canadian Montreal style, slightly sweeter (they are boiled in water sweetened with Canadian maple syrup or honey) and a little smaller than New York style bagels. They are slightly crispy on the outside and chewy on the inside. They are incredibly tasty with the perfect chewiness you’ve come to expect from a high quality bagel! If you’re gluten free and miss eating bagels, you’re going to love this recipe!
This recipe is dedicated to my incredible Mom, Ceclie, who taught me everything I know about baking! Thanks Mom for sharing your wisdom with me and imparting a love of healthy cooking and living! I love you with all my heart.
CONTENTS (JUMP TO ANYTIME)
- INGREDIENTS IN TEFF GLUTEN FREE SOURDOUGH BAGELS
- HOW TO MAKE TEFF GLUTEN FREE SOURDOUGH BAGELS: STEP-BY-STEP INSTRUCTIONS
- HELPFUL VIDEOS & FAQ
- HOW TO STORE, FREEZE & REHEAT GLUTEN FREE SOURDOUGH BAGELS
- TIME SAVING TIPS
- PIN THIS RECIPE TO PINTEREST – for later use
FOLLOW ME
Already on Pinterest? Please feel free to PIN the following image:

INGREDIENTS
(in Teff Gluten Free Sourdough Bagels)
Have you ever thought of bagels as healthy? Me either. However, these bagels are made with ancient grain teff flour & contain ingredients that are not only easier to digest, but also have numerous health benefits! Check it out.
DRY INGREDIENTS IN TEFF GLUTEN FREE SOURDOUGH BAGELS
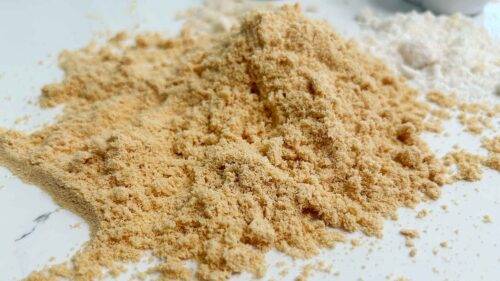
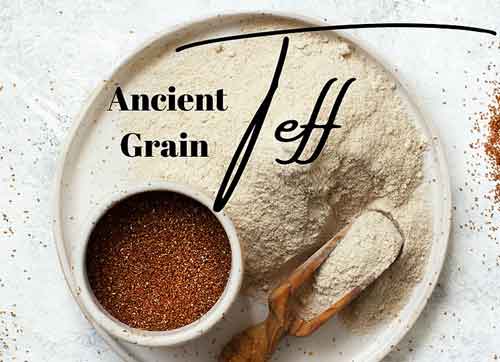
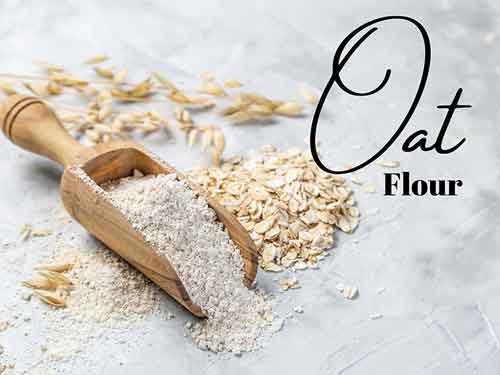
- Ancient Grain Teff & Oat Gluten Free Flour
* See my post Ancient Grain Teff & Oat Gluten Free Flour Blend for ingredients & instructional details.
- TEFF is a small cereal grain that derives from the plant “Eragrostis tef”. These grains have a great nutrient profile & a mild nutty, molasses flavour. Teff is a very popular grain grown in Africa where it is used to prepare injera, a fermented sourdough bread.
- Substitutes: Teff Flour can be substituted with Sorghum Flour. I am currently testing out some recipes now and will post this substitution once I’ve perfected them.
- OAT FLOUR is a grain flour made from, you guessed it, oats! Oat flour lends a mildly nutty flavour & tender crumb. Used alone it can make baked goods crumbly or gummy.
- Make your own Oat Flour! Just use your high speed blender to grind your gluten free oats into a fine powder. You can use either rolled oats, quick oats or steel cut oats (these require more blending but are a fantastic choice)
- Can’t consume oats – just sub with sorghum flour!
- You can find Teff Flour & Oat Flour at most grocers and health stores (e.g. Blush Lane Organics & Community Health Foods in Calgary).
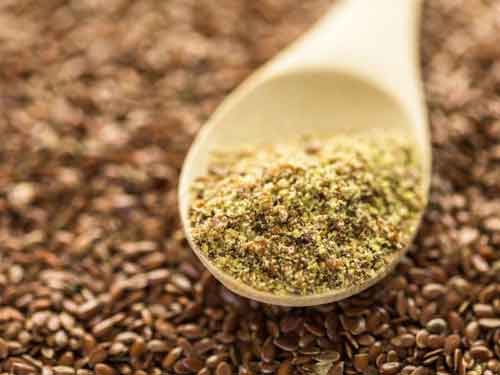
- FLAX SEEDS are high in protein content. Although flax is an excellent binder we use it in this blend for its binding power & protein content. I still recommend using an additional binder in your recipes.
WHAT IS PSYLLIUM HUSK ANYWAY?
- Psyllium Husk
Psyllium is a form of soluble fiber from a plant called Plantago Ovata, that grows worldwide but is most common in India. The plant produces gel-coated seeds, from which psyllium husk is derived.
Psyllium is one of the main ingredients in Metamucil! So needless to say it is incredibly good for the intestinal tract and in fact it enhances the digestive process & has prebiotic effects. Psyllium husk is very rich in fibre and can help improve & prevent constipation and haemorrhoid pain. Research is even showing it can help manage diabetes and may even lower risk of developing diabetes! On top of all of that psyllium husk is heart healthy, may help decrease blood pressure, decrease cholesterol & can help with weight management. Psyllium contains antibacterial compounds that help eliminate toxins in the body & in turn give you healthy glowing skin! You can find psyllium husk at most grocers and health stores (e.g. Blush Lane Organics).
- Salt
I like to use kosher salt to give flavour & strength to the dough!
- Baking Soda (optional)
Baking soda is not added to the dough. It is simply added to the water while boiling the bagels to create a more alkaline environment. This not only helps with the rise of the bagel dough, but also to give the bagel a nice shiny finish, a chewy consistency, and kicks starts the browning of the surface for a crispy exterior. This is optional!
WET INGREDIENTS IN TEFF GLUTEN FREE SOURDOUGH BAGELS
- Active Sourdough Starter (try my rice free sorghum sourdough starter)
This can be either starter that has been maintained in the refrigerator or starter that has been regularly fed at room temperature. As long as the starter is healthy, vital and active! Prior to mixing your dough make sure to feed your starter & get it nice & active!
The sourdough starter is the biological leavening agent in this recipe and will give your gluten free sourdough bagels a lovely rise and crumb! If you don’t have a starter yet and would love to make one, please check out my follow along video guide that will make creating a gluten free sourdough starter easy for you!
Wet Ingredients
- Warm Water
The most ideal Water temperature to activate yeast is between 105-115°F (40.6-46.1°C). In fact, yeast dies at 130-140°F. So if you place your sourdough starter in water >140°F your dough will not rise properly. Inversely, yeast in water <100°F will create a very sticky dough that will not rise as well either. So it is totally worth investing in a kitchen thermometer for this purpose.
- Apple Cider Vinegar
Apple Cider Vinegar is used to strengthen the dough. You’ll find that the dough springs up significantly after fermenting overnight. I like to use Bragg’s raw unfiltered Apple Cider Vinegar for its purity and flavour.
- Olive Oil
I use Extra Virgin Olive Oil for moisture and a boost of heart healthy fats. I like this brand which I get at Costco.
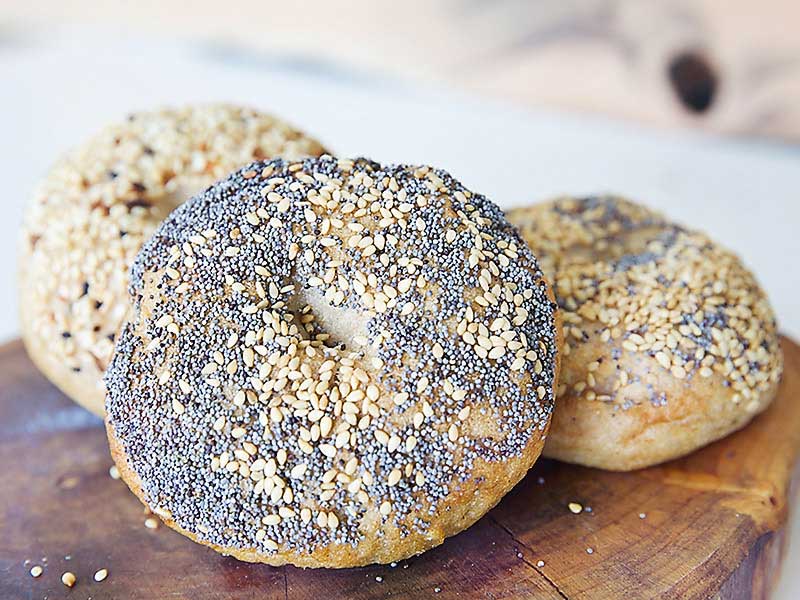
TOPPINGS
- Toppings
The sky is the limit! Some options we love are Sesame Seeds, Poppy Seeds & Everything Bagel Spice (which we mix ourselves – I’ll post a recipe soon!)
DO I REALLY NEED TO WEIGH THE INGREDIENTS?
Yes! I have learn’t through experience that weighing ingredients using a scale whilst baking is super important and will allow you to reproduce great results every time! I’ve attempted measuring out the flours by volume (e.g. cups), then double checked the weights of each. They were off by quite a lot actually! It can mean the difference between the most incredible and beautiful looking bagel, to one that quite literally flops. The density of the ingredient makes a BIG difference in the volume of the flour. A new bag of flour may be packed down tight vs an already opened one. A gram will always be a gram of flour!
A KITCHEN SCALE IS WORTH THE INVESTMENT
I use a very simple mini digital kitchen scale that I got for $19.99. Trust me it is well worth the investment! It is super easy to measure ingredients by weight. I think it’s WAY easier than measuring by volume (e.g. cups). To measure flour, place a bowl on the scale, press the tare button to zero your scale to the weight of the bowl, and then add your flour. Simple as that!
WHERE CAN I FIND INGREDIENTS FOR GLUTEN FREE BAGELS?
You can find all of these flours in Calgary at Blush Lane Organic Market and Bob’s Red Mill brand at many grocery stores including Superstore, Safeway & Save on Foods. You can also find them readily online! I’ve tried to put links where ever I can!
CAN I USE THIS BLEND TO SUB FOR REGULAR ALL-PURPOSE FLOUR?
YES YOU CAN! This flour mix may require a KEY staple ingredient (a binder) to be able to use it to replace wheat flours. My ancient grain teff gluten free blend blend does contain flax seed which is a binder, however, depending on the bake you are making, you may wish to add an additional binder. I always add an additional binder to my bakes with this lovely blend. Before you use this flour mix as a 1:1 substitute for regular wheat flour you may wish to learn more by reading my post about BINDERS (which explain more about binders & how to use them) and also How to make Crazy Good GF All-Purpose Flour (where you’ll learn how to create your own GF flour blend).
How & when do I add the additional binder?
You can add your binder when you mix your flour blend, however, I recommend adding it when you are ready to bake so that you can choose the best binder for each bake you make! I often use psyllium husk as an additional binder and when I do, I create a gel which I add to my dough. Check out my post on BINDERS to learn more.
HOW TO MAKE TEFF GLUTEN FREE SOURDOUGH BAGELS!
* For step by step quick instructions see recipe card below
NOTE: These bagels are small in size compared to some. I find them quite filling so I like them on the small side. You can always have two right? If you like a big giant bagel, you may want to try doubling this recipe and making a dozen as that will produce large bagels! Or you can keep the recipe as is and simply try making 6-8 bagels. If you try it, please let me know!
Ok, lets get right to it and make us some incredibly delicious bagels!
GLUTEN FREE SOURDOUGH BAGEL BAKING SCHEDULE
FRIDAY NIGHT
STEP 1: Feed your gluten free sourdough starter & get it active!
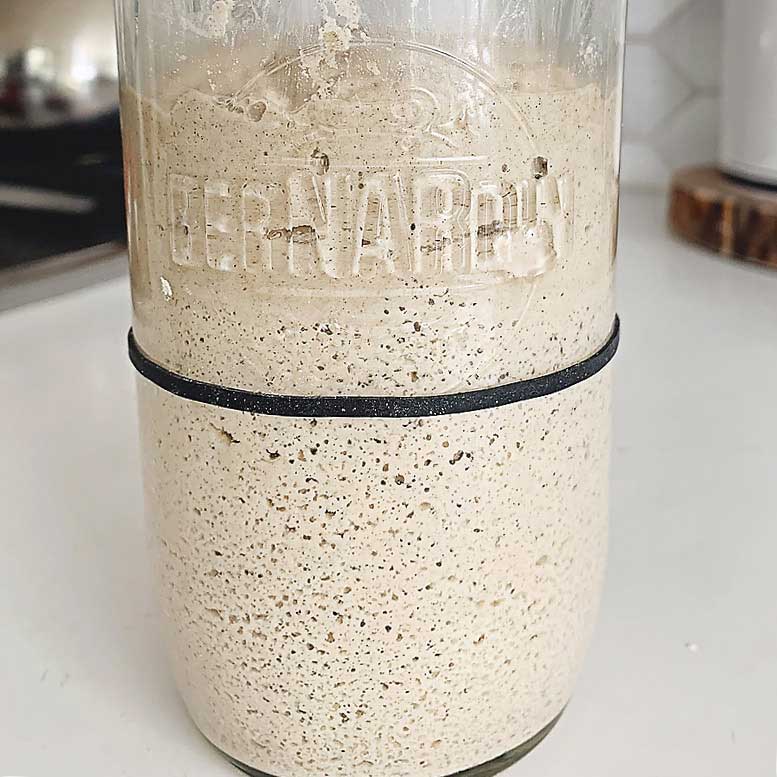
I like to keep my starter in the refrigerator & reactivate it when I am ready to bake! So I take the starter out of the refrigerator on Friday night & feed 15g of starter it a ratio of 1:5:5 to reactivate it. Feed 15g of starter, 75g flour (I use sorghum flour), & 75g of filtered water. This will give you 165g of starter.
Starter (S)
Feed
15g
15g
Flour (F)
e.g. Sorghum
75 g
75g
Liquid (L)
Filtered water
75g
75g
Ratio (Total)
1 : 5 : 5
Total
165g
My starter takes 24 hours at room temperature to reach peak activity. So this way, it is perfectly peaked when I am ready to mix my dough Saturday evening! Since we are not mixing a leaven (preferment) to save some time for these bagels, it is important that our starter is at it’s peak activity when we mix our dough! If you miss the peak, don’t worry, just feed your starter a little snack (e.g. 10-15g flour & 10-15g water) and when it peaks, mix your dough!
SATURDAY NIGHT
STEP 2: Create the dough & ferment overnight
Heat water to 100-110°F (38-43°C). Add warm water to the bowl of a stand mixer (or you can mix by hand in a large bowl).
Add active starter, maple syrup, olive oil, apple cider vinegar, salt and psyllium husk. Whisk to combine. Let rest for 10-15 minutes until it gels slightly.
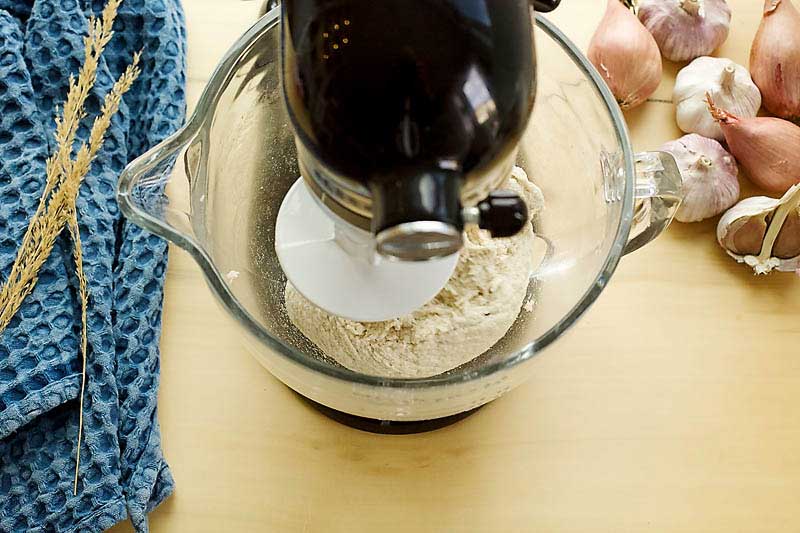
This is the fun part! Watch your dough come together beautifully. You’ll LOVE working with this soft & pliable dough! Add Ancient Teff & Oat Gluten Free Flour to the wet ingredients once gelled. Mix with a dough hook of stand mixer on low for about 2-4 minutes until all flour is incorporated. Increase speed to medium-high & mix for an additional 3-5 minutes until a nice dough ball forms.
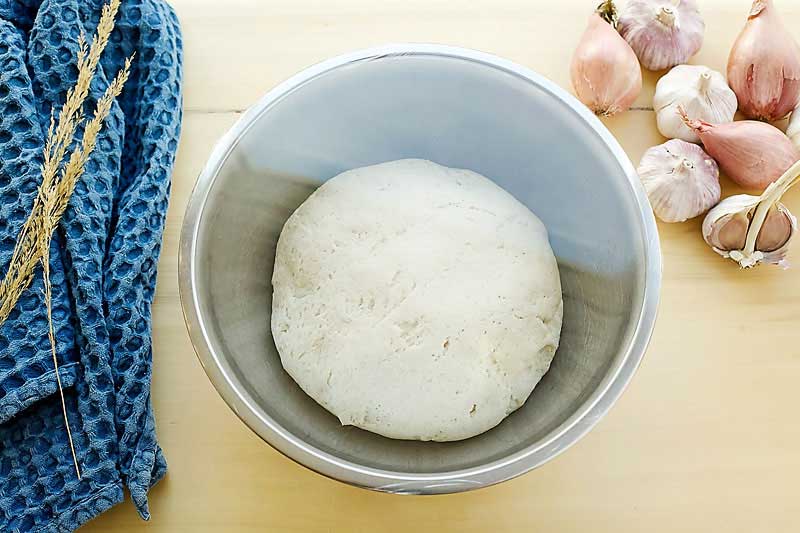
Shape dough into a round smooth ball and place in an airtight bowl with lid (or a bowl with plastic wrap) at room temperature (20-21°C / 68-70°F) for 8-10 hours (overnight). If your home is very warm you may need to refrigerate after a few hours (3-4) to prevent over-fermenting your dough.
Don’t have a mixer?
That’s ok! You can simply mix wet and dry together then kneed the dough for about 8-10 minutes like I used to as a kid. Make sure to kneed really well as it takes a little time for the dough to really come together. If it feels at all dry, make sure to keep kneading! It should feel smooth & soft & pliable.
SUNDAY MORNING
STEP 3: Shape the bagels
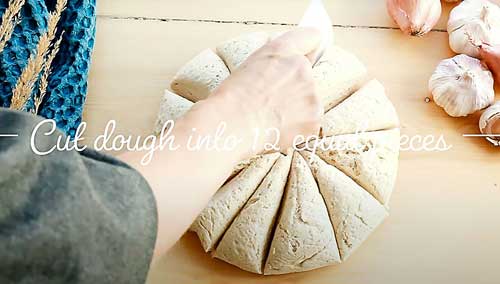
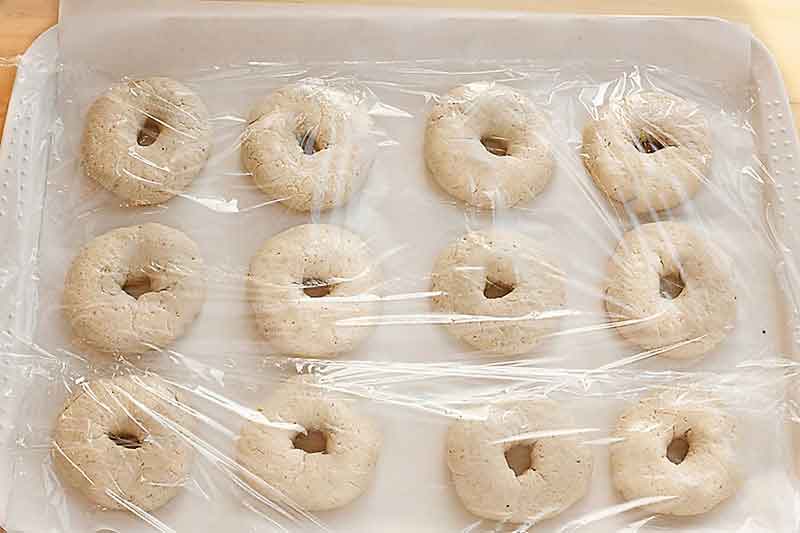
First thing Sunday morning, gently flip the dough out onto the countertop. It should have risen & puffed up significantly overnight with lovely air bubbles present, almost like it has a little bounce to it. Using a dough scrapper or a sharp knife, cut the dough into 12 equal pieces about 90-100g each. You don’t have to be exact! I like to quickly weigh my dough because creating equally sized bagels means perfectly baked bagels every time! It sure is nice to be able to easily reproduce your success each time you bake them too!
Remember these bagels are small. If you prefer larger bagels try making 8 bagels instead (they may need a few minutes longer cook time).
Roll each piece into ball with hands, being gentle but firm. I place plastic wrap over once rolled to prevent the dough from drying out.
USE PLASTIC WRAP TO SHAPE THE GLUTEN FREE BAGELS
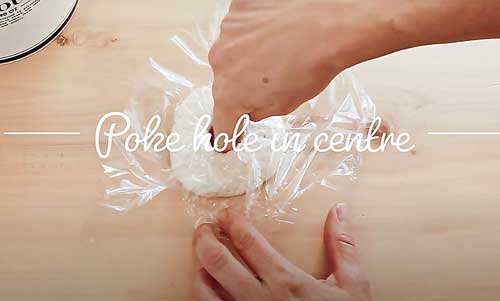
I cover dough balls with plastic wrap to assist shaping. Since this dough is not quite as strong as dough that contains gluten, I find this step really helps to create a beautifully shaped bagel without destroying the integrity of the dough. That being said, the sourdough starter does increase the strength of the dough in comparison to its yeast counterpart (recipe here)! Shape into flat round disc about 1/2″-1″ thick and 3″ diameter (I show in detail how I do this technique in my video below).
Keeping the plastic wrap in place, simply lift it slightly to release tension, then poke a hole in centre of the flattened dough ball.
Remove plastic wrap and shape the bagels gently with hands. Be very mindful that gluten free dough is not as strong as its gluten counterpart. This is why I say be gentle. You can easily shape this dough, it won’t be sticky at all, just use a gentle touch.
STEP 4: Let the little cuties rest
Just like most baking, these gluten free sourdough bagels need to rest for 15 minutes prior to boiling.
STEP 5: Preheat oven to 500°F
Preheat to 500°F convection if you have it. You will turn the oven down a bit once you’re ready to bake. I find the higher temperature helps get the bagels going and browns them just perfectly.
STEP 6: Boil Gluten Free Sourdough Bagels – Montreal Style!
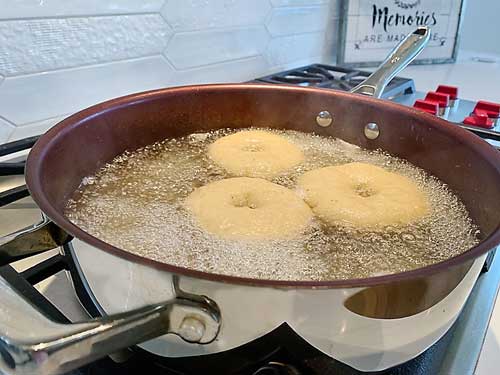
Whilst bagels are rising, add enough water to a large sauce pan to reach a depth of your second knuckle. Add maple syrup , salt & baking soda, and bring to a GENTLE boil. If the water is boiling hard, the bagels will disintegrate slightly, will be VERY hard to work with, and may go PLOP after boiled. So make sure to keep a close eye.
Flip & drop the bagels one at a time into water so that the tops cook first. Boil 3 at a time. Do NOT overcrowd. Watch that water remains at a gentle boil. Boil for 30 seconds then flip bagels with a slotted turner spatula (aka fish spatula) & boil underside for 30 seconds.
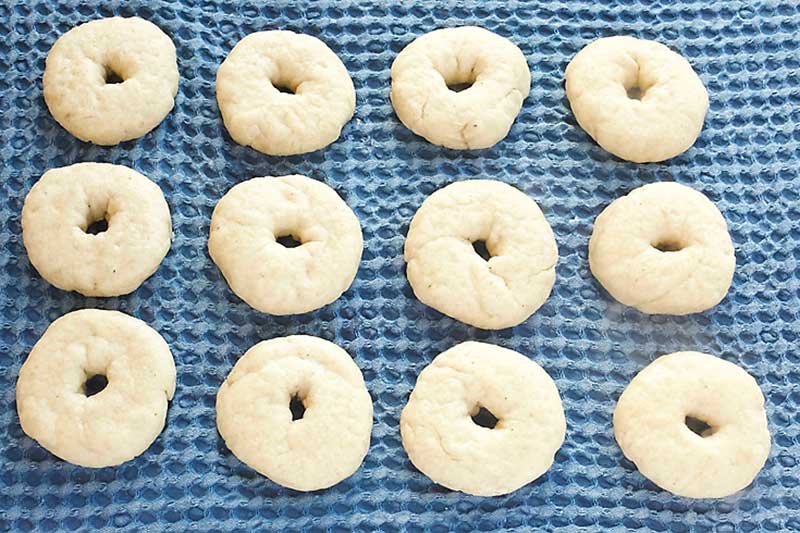
Remove bagels 1 at a time to a lint free kitchen towel to drip dry for 30sec-1 min. Do NOT let sit longer or bagels will stick! This step isn’t absolutely necessary, but I find if the bagels are too wet, they tend to be undercooked and doughy on the bottom.
Repeat until all 12 bagels are boiled.
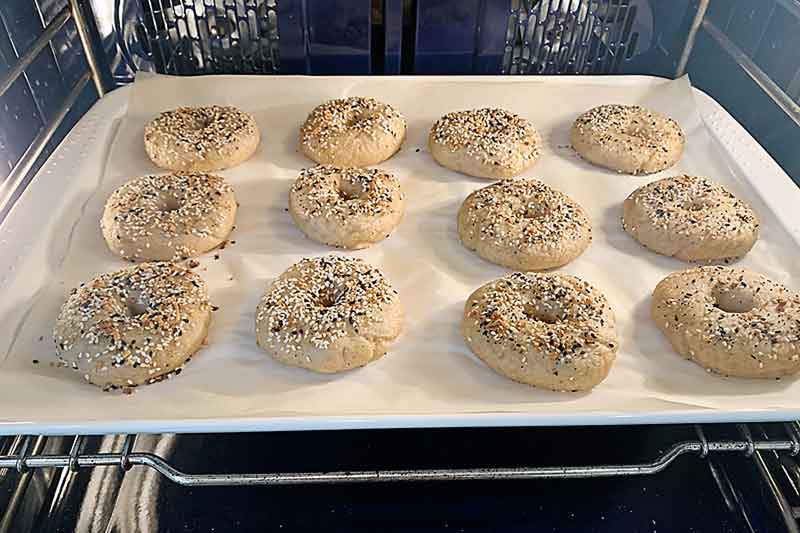
STEP 7: Toppings for Gluten Free Bagels
Place bagels on fresh parchment lined tray. Add desired toppings. See below video for two different ways to add toppings!
STEP 8: Bake Gluten Free Sourdough Bagels
Bake, in preheated oven @ 475°F (246°C) convection, on middle rack for 18 mins or until golden brown. Mine take 18 mins to be nicely browned and perfectly cooked. Please watch the bagels as all ovens are slightly different.
Convection ovens have a fan which evenly distributes the hot air throughout allowing bakes to cook 25% faster and at a lower temperature. If you don’t have convection, you may need to increase the bake time by 4-5 mins or so (25% longer).
Like your bagels browned a little more? Simply cook an extra 1 minute at a time until you reach your desired golden colour.
Don’t open the oven while the bagels are baking. The oven will kick in to reheat up to 500°F and may burn or unevenly cook your bagels. If you can’t resist taking a peak, like my daughter Ella and I, turn on the oven light so you can watch your bagels brown like magic!
Let bagels rest on baking tray 15 mins to finish cooking and retain moisture. If you cut into any baked breads to soon, the steam that you see leaving the bread is what keeps the bread moist. The bagels will dry out if you cut into them too soon. The bagel also continues cooking on the baking sheet for those 15 mins of rest. If you cut the bagel too soon it’ll be slightly doughy on the bottom. Be patient and wait at least 10mins! You can do it! Ok, Ok, you can try just one while it’s hot then wait 15 mins for the rest! I always do!
STEP 9: Let Rest THEN Enjoy!
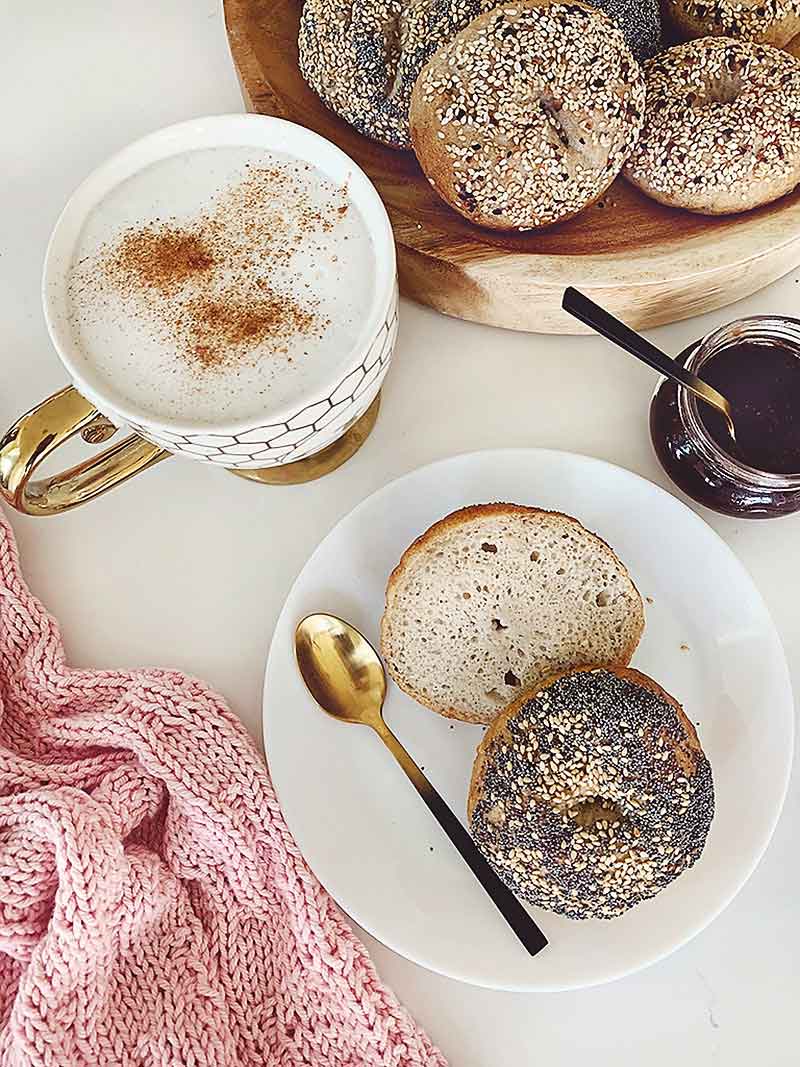
After resting, slice while still slightly warm & ENJOY! These bagels are just THE BOMB warm out of the oven (after a 10 min rest…hahaha!)
HELPFUL VIDEOS & FAQ
VIDEO – How to Shape Gluten Free Sourdough Bagels
Click image to watch video
VIDEO – Add Toppings to Gluten Free Sourdough Bagels
Click image to watch video
DO MY GLUTEN FREE BAGELS NEED A WASH ON TOP?
A wash on top of your bagels is totally optional. It allows the toppings to stick a little better & helps with the browning of the tops. I didn’t use a wash in the video instructions, but sometimes I do.
AQUAFABA WASH: If like me, you don’t eat eggs, simply use a little aquafaba (liquid from a can of chickpeas or soaked chickpeas) and brush it on top prior to topping bagels! It works like a charm!
EGG WASH: If you can eat eggs, using an egg wash on top of the bagels prior to adding toppings helps make them stick better to the bagel and also helps the tops brown nicely. I never use the egg wash anymore but wanted to add this tip for others who wish to try it. Simply make the egg wash by taking the egg white from 1 egg and mix with 2 Tbsp of water. Brush on top of bagels, then sprinkle or dip on the toppings of your choice.
TO STORE, FREEZE & REHEAT GLUTEN FREE BAGELS
Once bagels are totally cooled, after at least 30 mins, store in an air tight container on countertop for a few days (3 max, but I promise they won’t last that long). They are best toasted slightly too warm and create a slightly crispy exterior. If you can eat dairy, try adding some grass fed butter to a warm bagel. Your tummy will thank you 🙂
These bagels freeze VERY well. Simply slice in half, wrap in plastic wrap (or parchment) then place in a glass container or freezer bag & freeze. They thaw nicely on the counter overnight. If toasted slightly, the bagels will taste like they just came out of the oven!
Please ENJOY!
TIME SAVING TIPS!
- Enlist HELP: start “Baking your way around the world” with my family and get your children or loved ones involved in the food prep. Cooking together can be SO much fun and a great way to bond! Wouldn’t it be great if kids could leave home with skills in the kitchen! Plus, I want to be able to go to my kids houses for a delectable meal when I’m retired!
- Mix Flour Ahead: I strongly recommend making our Ancient Grain Teff Gluten Free Flour mix ahead of time. It cuts down on the prep time drastically and makes these bagels super fun and easy to make. I like to keep an airtight container on my counter specially for my Ancient Grain Teff Gluten Free Flour. Remember to sift flour right into the mixer bowl so you get rid of any nasty lumps!
- Keep your starter healthy, vital & active! If your starter is kept in a constantly healthy & active state your baking will be just that much better! Check out my post here for more on how to maintain your sourdough starter!
ENJOY!
I hope you all LOVE this recipe inspired by my beautiful Momma who taught me my love of cooking. If you make this recipe, please be sure to rate it and leave a comment below. Or take a pic, upload it to Instagram and tag #Turmeric_Me_Crazy. If you have questions, please contact me. Please subscribe to keep up to date with my latest recipes.
If you’ve enjoyed this series so far, please share it with your loved ones or better yet, PIN it to your Pinterest page. I’d love it if you followed me with the links below 🙏🏻
Much love and hugs,

FOLLOW ME!
Please follow me on Pinterest, Instagram & Facebook
Already on Pinterest?
Feel free to PIN the picture below for future reference & so others can find it too 🙏🏻
Equipment Needed
- 1 Stand Mixer optional
INGREDIENTS
Wet Ingredients
- 150 g Gluten Free Sourdough Starter Active
- 405 g Warm Water 100-110°F
- 30 g Olive Oil extra virgin
- 30 g Pure Maple Syrup
- 8 g Apple Cider Vinegar I use Bragg Organic raw, unfiltered
Dry Ingredients
- 455 g Ancient Grain Teff & Oat Gluten Free Flour *see recipe in notes or link
- 15 g Psyllium Husk (I use Blush Lane's variety)
- 9 g Kosher Salt
For Boiling
- 2-3 Tbsp Maple Syrup or Honey
- 1 tsp Salt
- 1 Tbsp Baking Soda (optional – increases chewiness)
Bagel Topping
- 2 Tbsp Sesame Seeds or Poppy Seeds or others *see notes for more ideas
INSTRUCTIONS
FRIDAY NIGHT: Feed gluten free starter – make sure it's active!
- Friday night – feed your starter & ensure you'll have 150g of active starter. See post for details
SATURDAY NIGHT: Mix the dough & ferment overnight
- Heat water slightly to warm to about 100-110°F (38-43°C). Add to the bowl of a stand mixer (or large bowl if mixing by hand).
- Add active sourdough starter, maple syrup, olive oil, apple cider vinegar, salt & lastly psyllium husk. Whisk to combine & let rest 10-15 mins to gel slightly.
- Add Ancient Grain Teff & Oat Gluten Free Flour. Mix with the dough hook of stand mixer on low 2-4 mins until incorporated. Increase speed & mix for 3-5 mins until forms a nice ball.
- Shape dough into round ball & place in an airtight container (or bowl with plastic wrap) at room temp for 8-10 hours (overnight).
- NOTE: My kitchen is quite cool (20°C or 68°F). If your kitchen is on the warmer side, you may want to bulk ferment for about 3 hours then cold ferment (refrigerate) the dough overnight.
SUNDAY MORNING: Shape, boil & bake
- First thing in the morning, place dough on countertop. Cut into 12 equal pieces about 95-100g each.
- Roll each piece into ball with hands. Place plastic wrap over once rolled to prevent the dough from drying out.
- Cover dough balls with plastic wrap to assist shaping. Shape into flat round disc about 1/2"-1" thick and 3" diameter (see video).
- Poke a hole in centre of flattened dough ball and shape gently with hands.
- Place on parchment lined baking tray. Cover with plastic wrap & let rest for 15 mins.
Boil Bagels – Montreal Style
- Preheat oven to 500°F convection. If you don't have convection, you may need to increase the bake time by 4-5 mins or so (25% longer).
- Whilst bagels are resting, add enough water to a large sauce pan to reach a depth of your second knuckle. Add maple syrup, salt & baking soda (if desired). Bring to a GENTLE boil.2-3 Tbsp Maple Syrup or Honey, 1 tsp Salt
- Flip & drop bagels into water so cook the top 1st. Boil 3 at a time. Do NOT overcrowd. Watch that water remains at a gentle boil. Boil for 30 seconds. Flip bagels with a slotted turner (aka fish spatula) & boil underside for 30 seconds.
- Remove bagels 1 at a time to a lint free kitchen towel to drip dry for 30sec-1 min. Do NOT let sit longer or bagels will stick! Repeat until all 12 bagels are boiled.
Bake Bagels
- Place on fresh parchment lined tray. Add desired toppings.
- Turn oven down to 475°F (246°C) & bake on middle rack for 18 mins or until golden brown. Mine take exactly 18 mins. Please watch bagels as all ovens are slightly different.
- If bagels aren't browning as much as you like, let them bake an additional 1 minute at a time until you reach your desired golden colour.
Let Rest THEN Enjoy!
- Let bagels rest on baking tray 15 mins to finish cooking and retain moisture.
- After resting, slice while still slightly warm & ENJOY!
Notes
- To make 455g of ANCIENT GRAIN TEFF GLUTEN FREE FLOUR BLEND
- 237g Teff Flour
- 100g Oat Flour
- 73g Tapioca Flour (aka Tapioca Starch)
- 45g Flax Seed (ground)
- Bagel Topping Ideas
- Sesame or Poppy Seeds or mix
- Everything Bagel Spice
- Flaky Sea Salt
- Dried Minced Onion or Garlic or both
- Any mix of above or create your own!
- Cinnamon & Brown or Cane Sugar
- If you don’t have a mixer (or prefer to mix by hand), just make sure to knead the dough for about 10 minutes. I know this is controversial with gluten free dough as there is no gluten to develop, however, I find that it takes time to incorporate all of the ingredients. Especially as this recipe doesn’t use a soaker like most of my breads do. The starches initially absorb much of the moisture from the dough and I find it takes some work & time to get the moisture to the whole grains. The other option is to mix the dough 1st without the starches, then add them after it has rested for 30 mins or so. This way the whole grains can “soak” up some moisture.
- Prefer your bagels LESS CHEWY: try omitting the baking soda from the water bath when you boil them. I added this ingredient here (which I don’t do in my non-sourdough version) but it does make the bagels more chewy for sure!
- The dough should feel soft & smooth, & not dry at all. If the dough seems dry at all, try adding a little more olive oil. I have done up to 40g and it turns out soft and smooth. It shouldn’t feel dry at all. I tried to make this recipe with as little oil as possible, but my non-sourdough version uses 40g of olive oil. Depending on our environments, the dough can be quite different and need a little more moisture.
- CRACKS in your bagels after shaping? Try using the plastic wrap and pinching and smoothing out any cracks prior to boiling them. You can be quite aggressive with the dough with the plastic wrap over it. I also ensure to cover with resting dough at all times with plastic wrap so it doesn’t ever get a chance to dry out. I do this every time as I like my bagels to look like regular bagels, not gluten free ones!
- Please remember that not all gluten-free flours are made equally. If you chose to use a premixed gluten free flour the bagels may not turn out right. Trust me, I tried! Who wants to do all the work to have them flop right! It’s well worth the investment to buy the individual flours and make your own. I promise it’s easy and SO worth it! If you have a hard time finding any of the flours, I’ve placed links for each of them on Amazon.
- If you haven’t eaten them all straight out of the oven…trust me you’ll be tempted…these bagels are best toasted slightly to warm them and create a slightly crispy exterior.
- Convection ovens have a fan which evenly distributes the hot air throughout allowing bakes to cook 25% faster and at a lower temperature. If you don’t have convection, you may need to increase the temp by about 25°F (15°C) and increase the bake time by 4-5 mins or so.
- Once bagels are totally cooled (after at least 30 mins), store in an air tight container on countertop for a few days (3 max – they won’t last that long)!
- The next day, the bagels are best toasted slightly to warm them and create a slightly crispy exterior.
- These bagels freeze well. Simply slice in half, then place in a glass container or freezer bag & freeze. They thaw nicely on the counter overnight. If toasted slightly, the bagels will taste like they just came out of the oven!
Nutrition
PLEASE RATE & COMMENT
I know you’ll just love these perfectly chewy on the inside & crispy on the outside, Ancient Grain Teff Gluten Free Sourdough Bagels! Aside from being incredibly delicious, you honestly can not tell they are gluten free! If you try it, please add a rating onto the recipe above or at the bottom of the post as it helps Google recognize the recipe & my website which will help show it to more people. I’d love to see our community grow! ♡
Now let’s get baking!

2 Responses
This looks amazing! What about an oat free alternative?
I hope you love them as much as we do! I did mention in the main post of this recipe that you can substitute oat flour with sorghum flour. However, I am also working on another post that explains alternate flours that I hope will be useful for you. This is also the topic most asked for so I am planning to shoot it as my next gluten free video. I hope this helps.
Hugs,
Trish