...but no more!

...but no more!

Using Air-Dry Clay With Decorative Moulds – Beginner’s Tips & Tricks

Want to get started with air dry clay but not sure how to use decorative moulds? In this beginner-friendly tutorial, I’ll walk you through everything you need to know to create beautiful, detailed pieces with ease using decorative clay moulds!

Hi, I'm Trish

It’s so lovely of you to visit my world kitchen! My families dietary needs were enough TURMERIC ME CRAZY, but NO MORE! 

Follow us on your social

NEVER MISS A RECIPE!

Get updates on latests recipes from TurmericMeCrazy straight to your inbox!

Air dry clay is a fantastic, beginner-friendly medium that opens the door to endless creative possibilities. Whether you’re crafting home decor, ornaments, embellishments for mixed media art, or just having fun, pairing air dry clay with decorative moulds can elevate your projects beautifully.

If you’re new to this technique, don’t worry! Below are some tried-and-true tips to help you get clean, detailed results with ease.

Air dry clay is a fantastic, beginner-friendly medium that opens the door to endless creative possibilities. Whether you're crafting home decor, ornaments, embellishments for mixed media art, or just having fun, pairing air dry clay with decorative moulds can elevate your projects beautifully. If you're new to this technique, don’t worry! Below are some tried-and-true tips to help you get clean, detailed results with ease.

Silicone molds can be used for a variety of projects, including making a beautiful French inspired wall, updating some old furniture with some vintage inspiration, or even spicing up some old picture frames or mirrors to give them a gorgeous vintage patina. 

French-inspired wall paneling, or boiserie, is a timeless way to add elegance and charm to any space. Characterized by intricate moldings, raised panels, and classic symmetry, this style instantly elevates your interiors with a Parisian flair. This DIY wall paneling project is sure to bring elegance and style to any space.
French-inspired wall paneling, also known as boiserie, brings a touch of timeless elegance to any space.

Love our French-Inspired wall paneling? We’ve got a detailed instructional video to make things smooth and easy! Check it out here! ♡

using air-dry clay with decorative moulds

Tip #1: Choose the right moulds & clay

My first top tip is to choose the right molds and clay for your projects. My favourite molds are the Iron Orchid Design molds, and that’s because they have gorgeous designs, and each mold has a raised edge, as well as an exact measurement that really makes a big difference. You can find them at my dear friends store, Rustic Ranch, in Airdrie, Alberta or online here.

Air dry clay is a fantastic, beginner-friendly medium that opens the door to endless creative possibilities. Whether you're crafting home decor, ornaments, embellishments for mixed media art, or just having fun, pairing air dry clay with decorative moulds can elevate your projects beautifully. If you're new to this technique, don’t worry! Below are some tried-and-true tips to help you get clean, detailed results with ease.

Top quality air-dry clay

Choosing a good quality clay or resin really helps to hold the fine detail and decreases shrinking and cracking of your project. I use the IOD air-dry clay but I have tried other kinds and they work well too. If I had to choose where to spend my money, I’d go with the IOD moulds and use a more affordable clay.

Air dry clay is a fantastic, beginner-friendly medium that opens the door to endless creative possibilities. Whether you're crafting home decor, ornaments, embellishments for mixed media art, or just having fun, pairing air dry clay with decorative moulds can elevate your projects beautifully. If you're new to this technique, don’t worry! Below are some tried-and-true tips to help you get clean, detailed results with ease.

Tip #2: use a scale to minimize waste & cost

If you choose the IOD molds, using a scale will help you minimize waste. This will make a huge difference to cost if you’re doing a large project. 

Air dry clay is a fantastic, beginner-friendly medium that opens the door to endless creative possibilities. Whether you're crafting home decor, ornaments, embellishments for mixed media art, or just having fun, pairing air dry clay with decorative moulds can elevate your projects beautifully. If you're new to this technique, don’t worry! Below are some tried-and-true tips to help you get clean, detailed results with ease.

Tip #3: store clay in an air-tight container

Make sure to always store your clay in an airtight container, even in between making individual molds. It dries out extremely fast and a dry clay will not work in silicone moulds. 

USEFUL MATERIALS

  1. Iron Orchid Designs (IOD)Air-Dry Clay
  2. IOD Clay Molds:
  3. Bench Scraper
  4. Plastic Wrap
  5. Tite Bond – Quick & Thick Glue
  6. Dry Paint Brush

Tip #4: PREPPING SILICONE MOULDS

Use a paint brush to apply a little tapioca starch (or any other starch) to your mold before adding your clay. This really helps to prevent sticking and makes de-moulding way easier. so just paint it on and then tap the excess off.

Air dry clay is a fantastic, beginner-friendly medium that opens the door to endless creative possibilities. Whether you're crafting home decor, ornaments, embellishments for mixed media art, or just having fun, pairing air dry clay with decorative moulds can elevate your projects beautifully. If you're new to this technique, don’t worry! Below are some tried-and-true tips to help you get clean, detailed results with ease.

Tip #5: Plastic wrap is your friend

Tip number five is to use plastic wrap to smooth the clay and keep it moist while you work on getting that clay into the mould. This is a super easy tip that is really helpful because if you get pulled away from your project, you don’t have to worry about your clay drying out.

It also really helps to create that perfectly smooth back for the glue to adhere to. 

Air dry clay is a fantastic, beginner-friendly medium that opens the door to endless creative possibilities. Whether you're crafting home decor, ornaments, embellishments for mixed media art, or just having fun, pairing air dry clay with decorative moulds can elevate your projects beautifully. If you're new to this technique, don’t worry! Below are some tried-and-true tips to help you get clean, detailed results with ease.

Tip #6: How to get clean edges

My next tip is to use starch to clean the edges. I use tapioca starch but any other starch will do, like corn starch or arrowroot powder.

This is where those iron orchid (IOD) molds are really superior. As that raised edge just allows you to rub your finger along or use a little tool like this palette knife to just quickly clean off the edges and make it perfect.

Air dry clay is a fantastic, beginner-friendly medium that opens the door to endless creative possibilities. Whether you're crafting home decor, ornaments, embellishments for mixed media art, or just having fun, pairing air dry clay with decorative moulds can elevate your projects beautifully. If you're new to this technique, don’t worry! Below are some tried-and-true tips to help you get clean, detailed results with ease.

Tip #7: De-moulding trick

The plastic wrap comes in handy again when de-molding. Put your plastic wrap on top and then just give it a little smack on the countertop. This way it won’t come flying out and stretch when you’re removing it. It will just gently fall out and be perfect.

Air dry clay is a fantastic, beginner-friendly medium that opens the door to endless creative possibilities. Whether you're crafting home decor, ornaments, embellishments for mixed media art, or just having fun, pairing air dry clay with decorative moulds can elevate your projects beautifully. If you're new to this technique, don’t worry! Below are some tried-and-true tips to help you get clean, detailed results with ease.

Tip #8: smoothing out edges

Use a plastic or silicone palette knife to just run along the edges and clean them up. This will give your clay mould a perfectly clean edge.

Air dry clay is a fantastic, beginner-friendly medium that opens the door to endless creative possibilities. Whether you're crafting home decor, ornaments, embellishments for mixed media art, or just having fun, pairing air dry clay with decorative moulds can elevate your projects beautifully. If you're new to this technique, don’t worry! Below are some tried-and-true tips to help you get clean, detailed results with ease.

Tip #9: creating gorgeous designs with clay moulds

Tip number nine is to lay out your design before gluing and to try mixing and matching moulds. Try using a palette knife to isolate pieces of the mould that you like, and then combine different moulds together in order to get your own unique design. 

Laying it out before gluing like this allows you to play with pieces from different molds and create a beautiful design.

Air dry clay is a fantastic, beginner-friendly medium that opens the door to endless creative possibilities. Whether you're crafting home decor, ornaments, embellishments for mixed media art, or just having fun, pairing air dry clay with decorative moulds can elevate your projects beautifully. If you're new to this technique, don’t worry! Below are some tried-and-true tips to help you get clean, detailed results with ease.

Tip #10: tips for gluing your project

When gluing your project. I recommend using that palette knife to just gently move the glue all around the back surface. You don’t need a lot of glue if you put it on correctly.

Then use a measuring tape to make sure that you’ve centred your piece exactly where you want it on your project, and gently press down without squishing the clay at all and pushing it really gently in towards the rest of the project.

When the glue and clay dries, it will begin to pull away from the other pieces. So giving that gentle squish helps a lot.

I also like to clean up any excess glue that has oozed off the edges. This’ll make for a nice clean edge. 

Air dry clay is a fantastic, beginner-friendly medium that opens the door to endless creative possibilities. Whether you're crafting home decor, ornaments, embellishments for mixed media art, or just having fun, pairing air dry clay with decorative moulds can elevate your projects beautifully. If you're new to this technique, don’t worry! Below are some tried-and-true tips to help you get clean, detailed results with ease.

Tip #11: creating perfect corners

If you have corners in your project, like I did here in this mirror frame I was finishing. Use a palette knife to cut the pieces of the clay at a 45 degree angle on both sides before then gluing it down. Then you can use a straight edge to make sure that all those pieces are perfectly lined up at a 90 degree angle to the other corner. 

Air dry clay is a fantastic, beginner-friendly medium that opens the door to endless creative possibilities. Whether you're crafting home decor, ornaments, embellishments for mixed media art, or just having fun, pairing air dry clay with decorative moulds can elevate your projects beautifully. If you're new to this technique, don’t worry! Below are some tried-and-true tips to help you get clean, detailed results with ease.

Tip #12: Finishing to create smooth designs

Sometimes you want a really vintage look with lots of cracks and spaces. However, sometimes you might want a smooth finish, like in my French-Inspired Wall Paneling.

If this is the case in your project. Take some clay to fill in any cracks that may have happened, and use your palette knife to just kind of smooth it out. You can use either a silicone one or a plastic one like I’m using here.

Air dry clay is a fantastic, beginner-friendly medium that opens the door to endless creative possibilities. Whether you're crafting home decor, ornaments, embellishments for mixed media art, or just having fun, pairing air dry clay with decorative moulds can elevate your projects beautifully. If you're new to this technique, don’t worry! Below are some tried-and-true tips to help you get clean, detailed results with ease.

Then when there are spots where the clay has lifted up off of the surface, use some silicone based paintable caulking. Cut the tip at a 45 degree angle, point that angle towards the surface you want the silicone to be in and squeeze it in.

Then immediately use a wet finger and a wipe and just wipe the excess off. Remember to use this caulking once your clay has dried, and in an hour you can paint your surface. 

Air dry clay is a fantastic, beginner-friendly medium that opens the door to endless creative possibilities. Whether you're crafting home decor, ornaments, embellishments for mixed media art, or just having fun, pairing air dry clay with decorative moulds can elevate your projects beautifully. If you're new to this technique, don’t worry! Below are some tried-and-true tips to help you get clean, detailed results with ease.

Tip #13: finishing with paint and wax

My last tip is to use a lighter tone of paint in combination with different color waxes, to highlight all those beautiful accents that you’ve made. I’ll show you how I did this and another project coming up soon.

Air dry clay is a fantastic, beginner-friendly medium that opens the door to endless creative possibilities. Whether you're crafting home decor, ornaments, embellishments for mixed media art, or just having fun, pairing air dry clay with decorative moulds can elevate your projects beautifully. If you're new to this technique, don’t worry! Below are some tried-and-true tips to help you get clean, detailed results with ease.

ENJOY using air-dry clay with decorative moulds!

Want to learn how we created this gorgeous French-Inspired Panel Wall? Check out our how to page here!

French-inspired wall paneling, or boiserie, is a timeless way to add elegance and charm to any space. Characterized by intricate moldings, raised panels, and classic symmetry, this style instantly elevates your interiors with a Parisian flair. This DIY wall paneling project is sure to bring elegance and style to any space.
French-Inspired Wall Panelling made using air-dry clay and decorative moulds.

Watch more diy videos

Want to spice up your boring pantry? We have an entire series of videos from that will walk you through creating the pantry of your dreams! We’ve even worked hard to create a printable PDF file for you to use to help guide you and make everything fit your specifications. There’s even a fill in the blank measurements list to help you get started. We hope you enjoy it!

Subscribe to our YouTube Channel to be notified when our next video goes live! 

We are always working hard to get new DIY videos ready for you! Please check back again soon and subscribe to our blog & YouTube Channel to find out when our next videos are released.

Please support us ♥︎

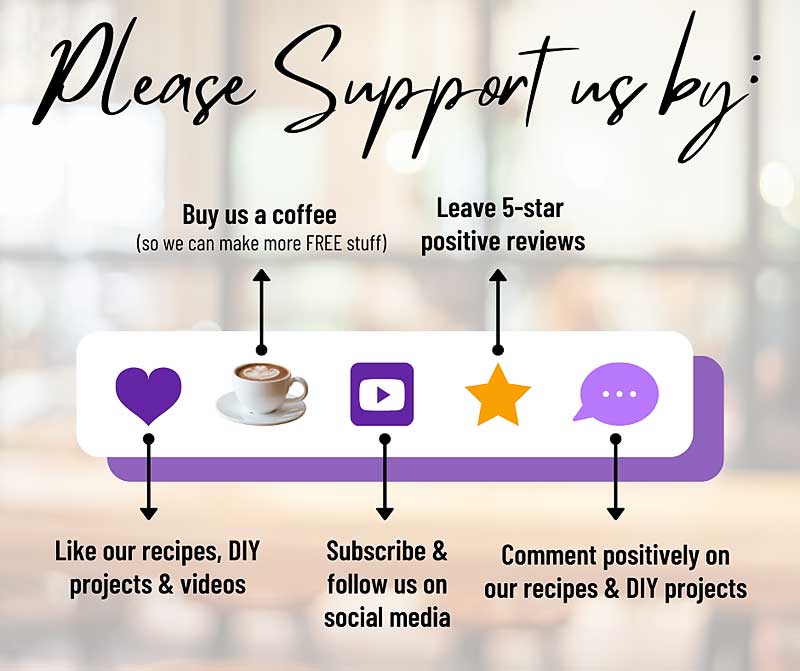
If you’re enjoying our free recipes & DIY projects at TurmericMeCrazy and would like to say thank you, here’s how:

1) Buy us a bag of groceries to help support us and say thanks for all of our hard work ♡.

2) Leave us 5 ⭐️⭐️⭐️⭐️⭐️ reviews & positive comments on the recipe pages as well as our YouTube Channel.

3) Subscribe to our monthly updates on TurmericMeCrazy.com & to our YouTube Channel.

3) Consider using some of my affiliate links on my website to buy products or check out my favourite kitchen things links.

Your support will allow us to continue to create free content on our blog & YouTube Channel! Thank you so much in advance 💜. We are truly grateful for the opportunity to help others enjoy creating both in and out of the kitchen!

Make a gorgeous crochet hanging basket for simple and beautiful pantry organization. This pantry idea is both stunning and functional! #pantryidea, pantry organization, pantry idea, crochet patterns, free crochet pattern, crochet hanging basket, pantry idea, pantry design

Want more DIY projects & delicious recipes at your fingertips?

Get updates on our latest posts, DIY projects & recipes from TurmericMeCrazy straight to your inbox!

By clicking subscribe you are consenting to receive emails from TurmericMeCrazy. I will only email you monthly with new recipes & updates. No spam I promise!

ARE WE CONNECTED YET?

Leave a Reply

Your email address will not be published. Required fields are marked *

Hi, I'm Trish

It’s so lovely of you to visit my world kitchen! My families dietary needs were enough TURMERIC ME CRAZY, but NO MORE! 

Follow us on your social

NEVER MISS A RECIPE!

Get updates on latests recipes from TurmericMeCrazy straight to your inbox!

i'm SO excited to have you!

Photograph-of-Blog-writer-Trish

Welcome to our community of

support