


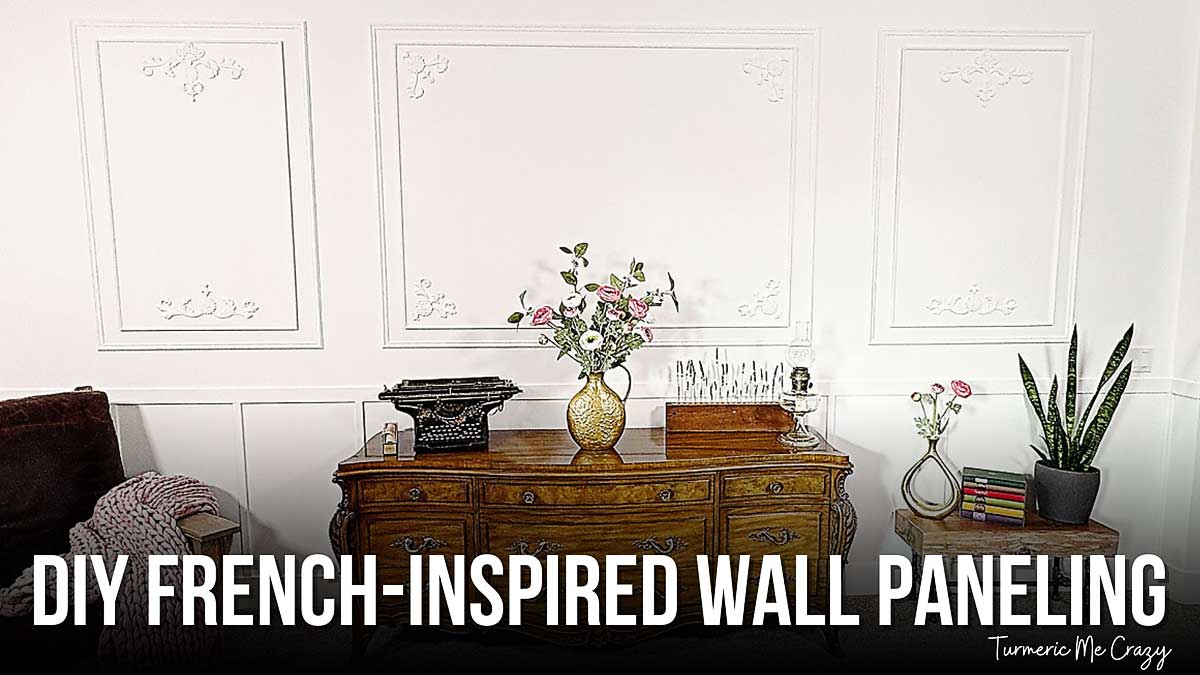
French-inspired wall paneling, also known as boiserie, brings a touch of timeless elegance to any space. Whether you’re aiming for a classic Parisian apartment look or a grand château-style interior, this decorative feature enhances walls with refined symmetry and intricate moldings. Here’s how to achieve it in your home. We’ve even got a detailed instructional video to make things smooth and easy! So let’s do this! ♡
I am so in love with this boiserie inspired wall paneling! Ever since I first visited Europe in my early 20’s, I have just loved the incredibly intricate details and hard work that went into buildings. When we moved into our current home I just knew I had to create something gorgeous on our large bedroom wall. I hope this project inspires you and gives you all of the tools you need to do the same in your special space!
Steps to creating French inspired wall paneling
Here is a comprehensive list of the supplies, materials and tools we used in this project:
Power tools
- Brad nailer with air compressor & 3/4″ brad nails
- Mitre saw
Other Tools & Materials
- Putty Knife (for spackling)
- Palate Knife (for clay)
- Carpenters Square
- Level
- Long Straight Edge
- Pencil
- Measuring Tape
- Wipes
- Sandpaper – 320 grit
Wainscotting materials
- MDF Moldings – our sizes:
- Corner Edging – called cove MDF
- Chair Rail: 2-1/2″ wide
- Stiles: 1-1/4″ wide
Picture Frame Molding materials
- MDF Edging – our sizes:
- 1-1/8″ wide x 3/8″ thick
- Wood Decorative Molding:
- 3/4″ wide x 7/16″ thick
- Plywood: 4×8 sheets 1/4″ thick
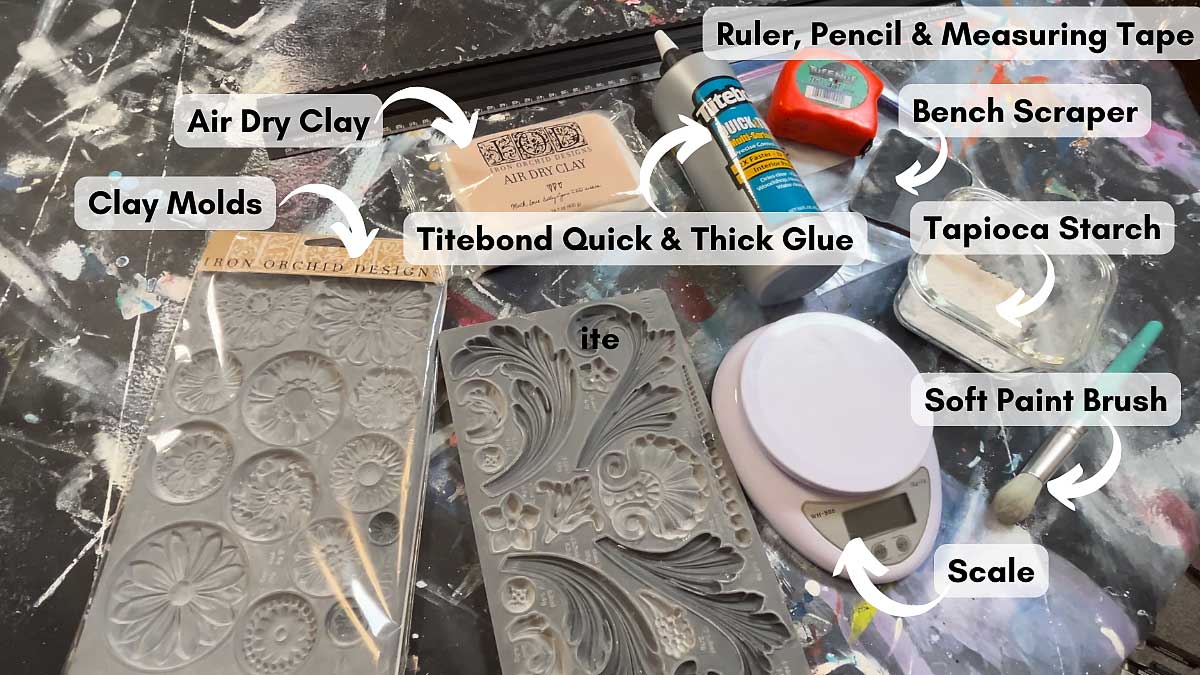
Clay Mold supplies
- Iron Orchid Designs (IOD)Air-Dry Clay
- IOD Clay Molds:
- Bench Scraper
- Plastic Wrap
- Tite Bond – Quick & Thick Glue
- Dry Paint Brush
Finishing supplies
- Spackling – DAP DryDex
- Paintable caulking – DAP Alex Plus, white
- PL construction adhesive
- Painters Tape
- Paint Brush
- Small Foam Roller
- Favourite Paint
- Large Paint Roller
STEP BY STEP french wall paneling
Step 1: design planning
Start by measuring your walls and sketching a layout. Traditional French paneling consists of evenly spaced rectangular or square frames, often extending from floor to ceiling. Decide whether you want a full-wall treatment or 2/3 upper boiserie style and bottom 1/3 wainscoting (like we chose). Make sure to use the traditional rule of thirds to maintain balance and create a more classic look.
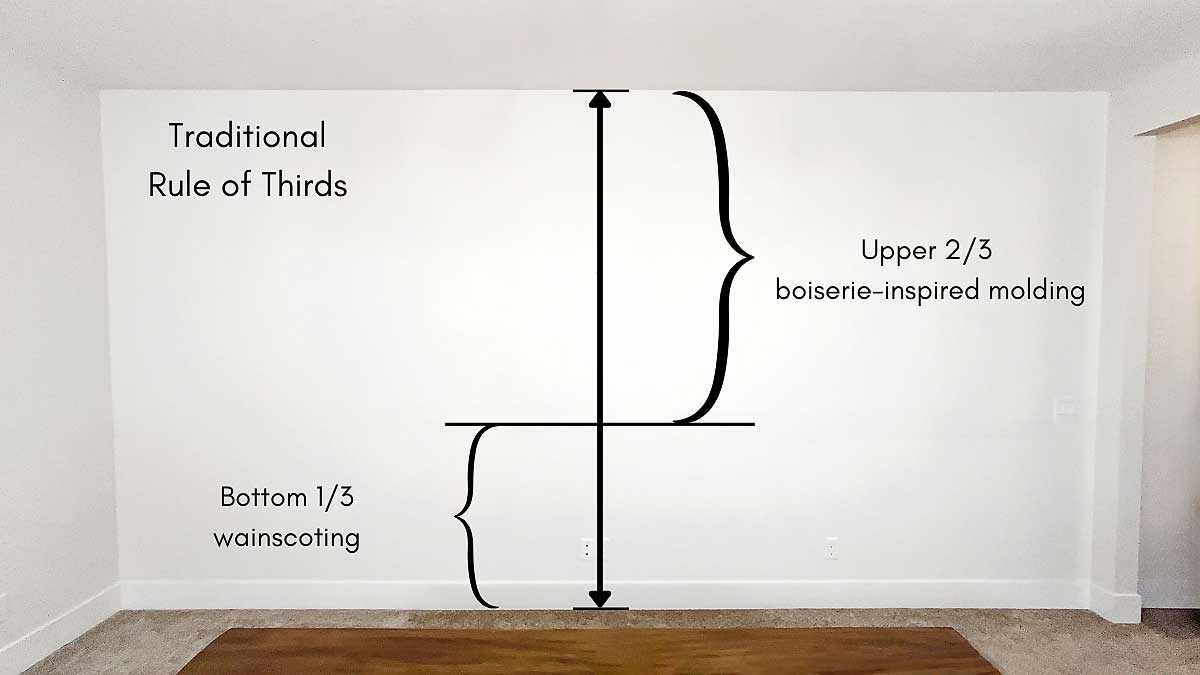
a) Bottom 1/3 Design (wainscotting)
We decided to create a simple but lovely wainscotting for the bottom 1/3 of our wall. The wainscotting consists of:
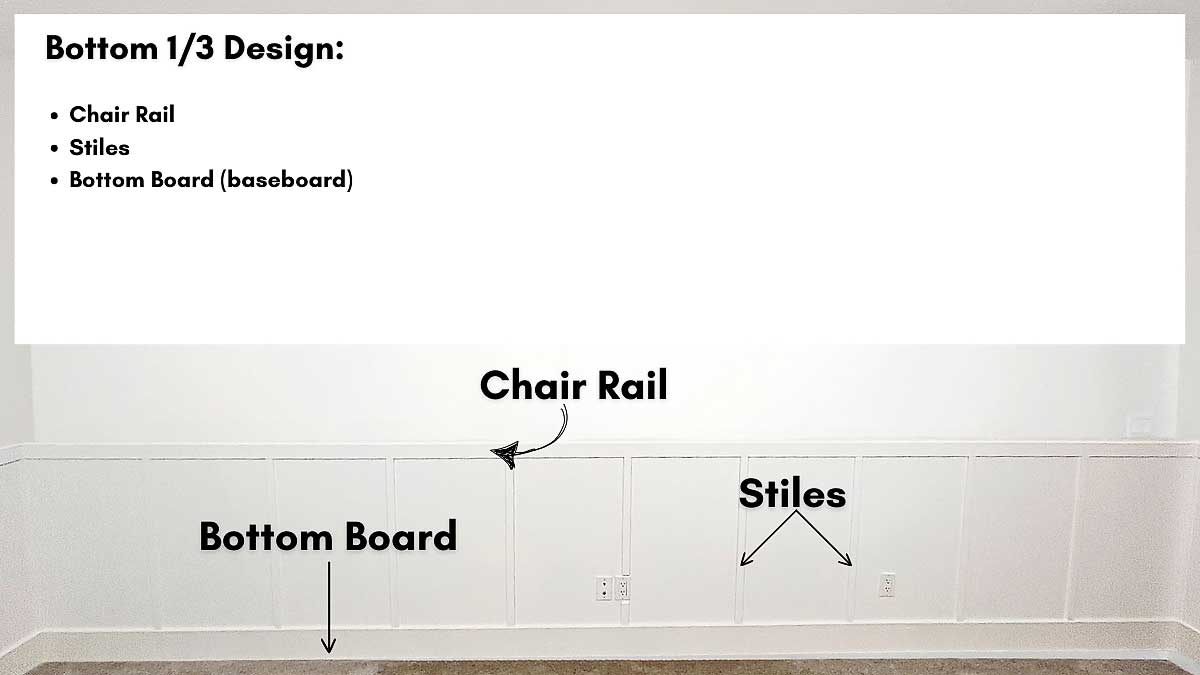
Chair rail:
- Typically placed at 1/3 wall height
- Adjust slightly to match nearby furniture heights
- For my 9-foot wall – chair rail is @ 36″ from the floor
- Chose simple piece or create a ledge with a decorative moulding piece
Chair rail sizing:
- Wide enough to create a strong horizontal visual break but not overpower the stiles.
- Standard Chair Rail Widths:
- 0.5 – 3 inches: A subtle, modern look
- 3 – 4 inches: The most common size, providing a well-balanced traditional style
- 4 – 5+ inches: A more dramatic or classic look, especially in large rooms with high ceilings
- How to choose the best size of chair rail:
- Ceiling Height: higher ceilings can support a wider chair rail (4+ inches)
- Room Size: larger rooms look better with thicker chair rails
- Existing Trim: the chair rail should complement the baseboards and crown molding
- Availability: chose best size based on what you can find
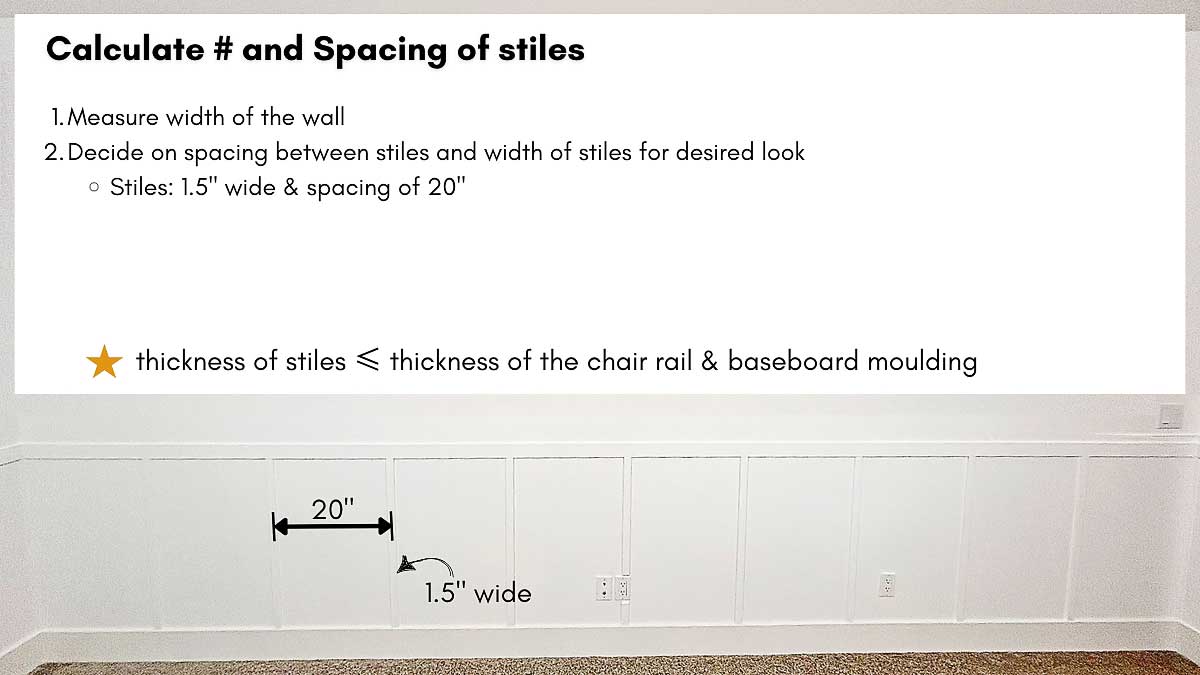
Stiles:
- Stile width:
- typically 1-4″ wide (stand out but NOT overwhelm the space)
- 1.5 – 2 inches: sleek and modern
- 2.5 – 3 inches: most common size, creating a well-balanced look
- 3.5 – 5 inches: A bold, farmhouse or craftsman-style appearance
- Choosing stile width:
- availability
- sizing complements chair rail, baseboards & moulding sizes
- thickness of stiles ≤ thickness of the chair rail & baseboard moulding
- size of wall: larger walls can handle wider stiles
- Stile spacing:
- closer spacing (12-16″) – creates a more traditional or detailed look
- best for shorter walls to avoid an empty look
- wider spacing (18-24″) – gives a more open, modern feel
- best for longer walls, wider spacing gives balance
- When choosing Stile spacing consider:
- size of the wall
- width of stile
- if stiles are narrow width place them closer together
- if stiles are wider space further apart
- closer spacing (12-16″) – creates a more traditional or detailed look
- Chair Rail vs. Stile Proportion
- The chair rail is usually wider than the stiles to create a visual anchor
- a good rule of thumb: Chair rail width ≈ 1.5× stile width.
- For a more subtle look, match the widths (e.g., 3-inch chair rail and 3-inch stiles).
- Consider the room’s style:
- wider chair rails and stiles create a more traditional feel
- while thinner ones work well for a modern aesthetic
- The chair rail is usually wider than the stiles to create a visual anchor
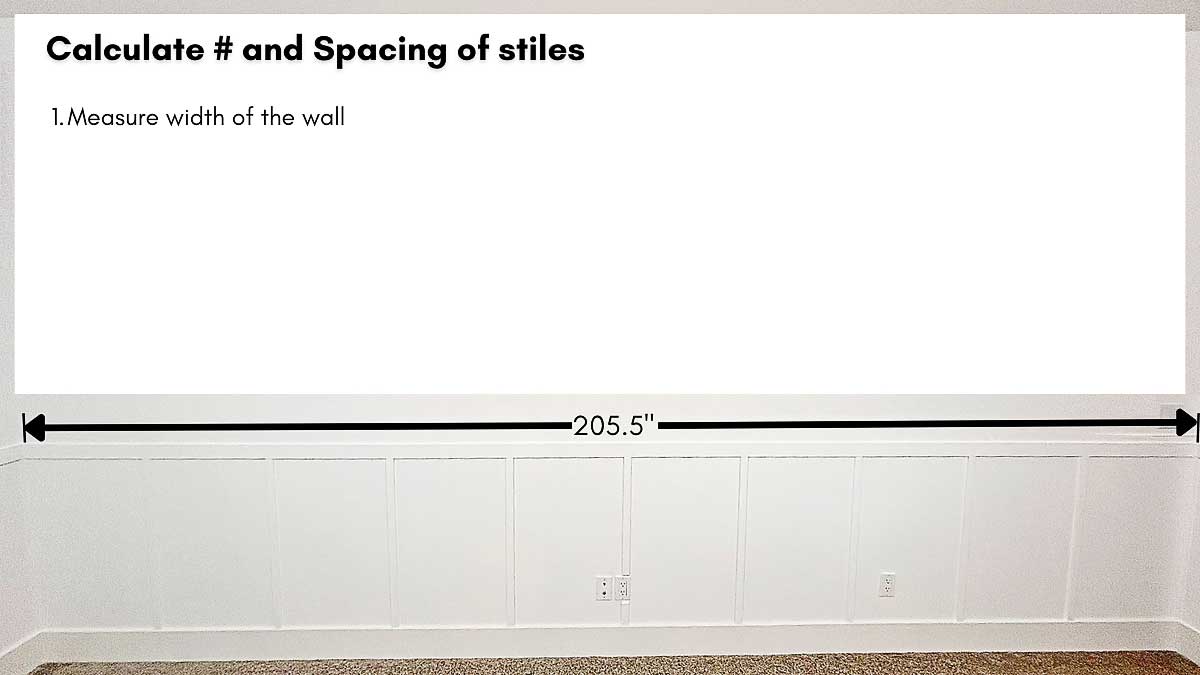
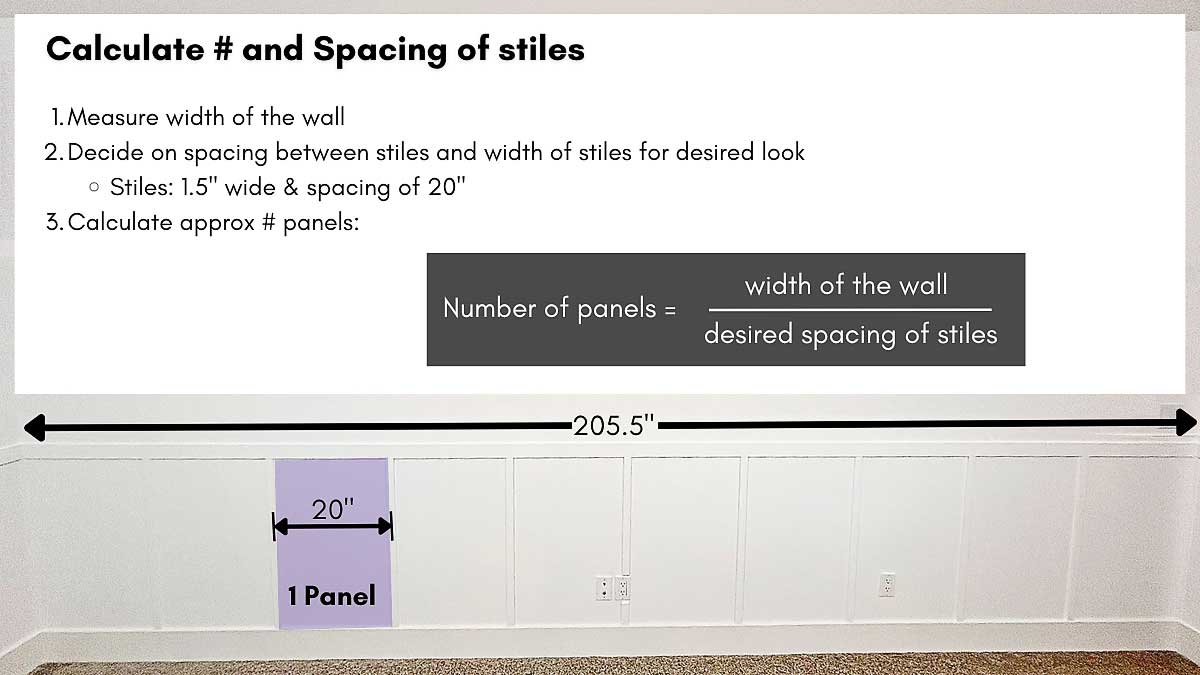
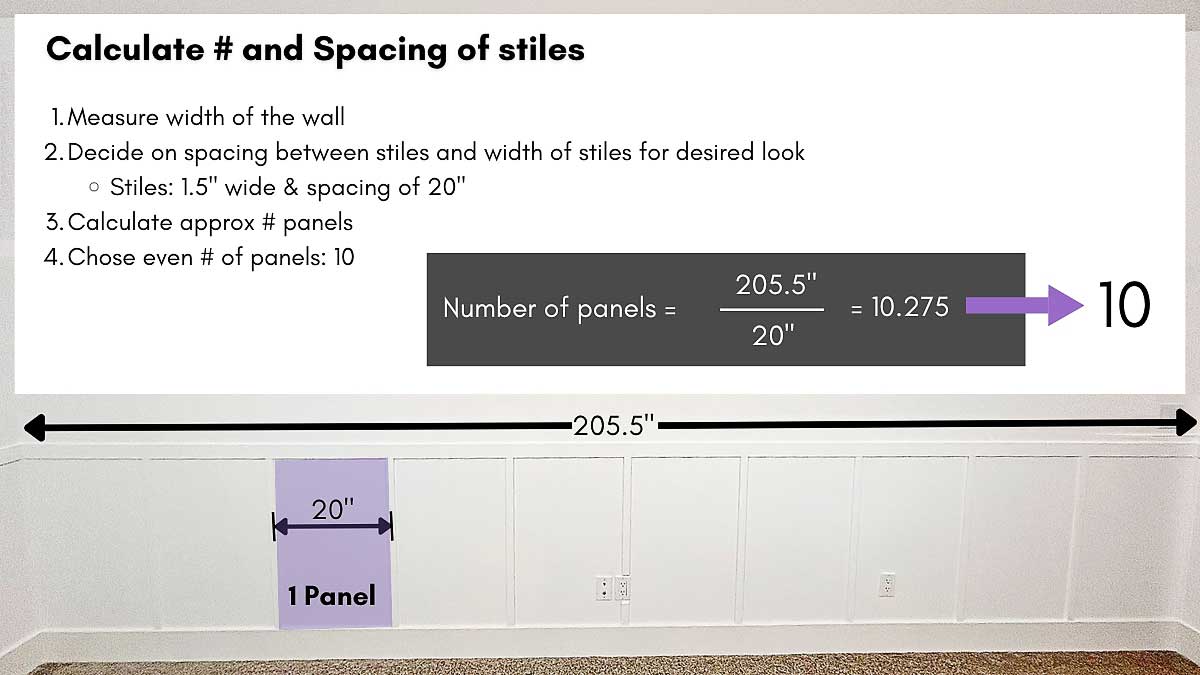
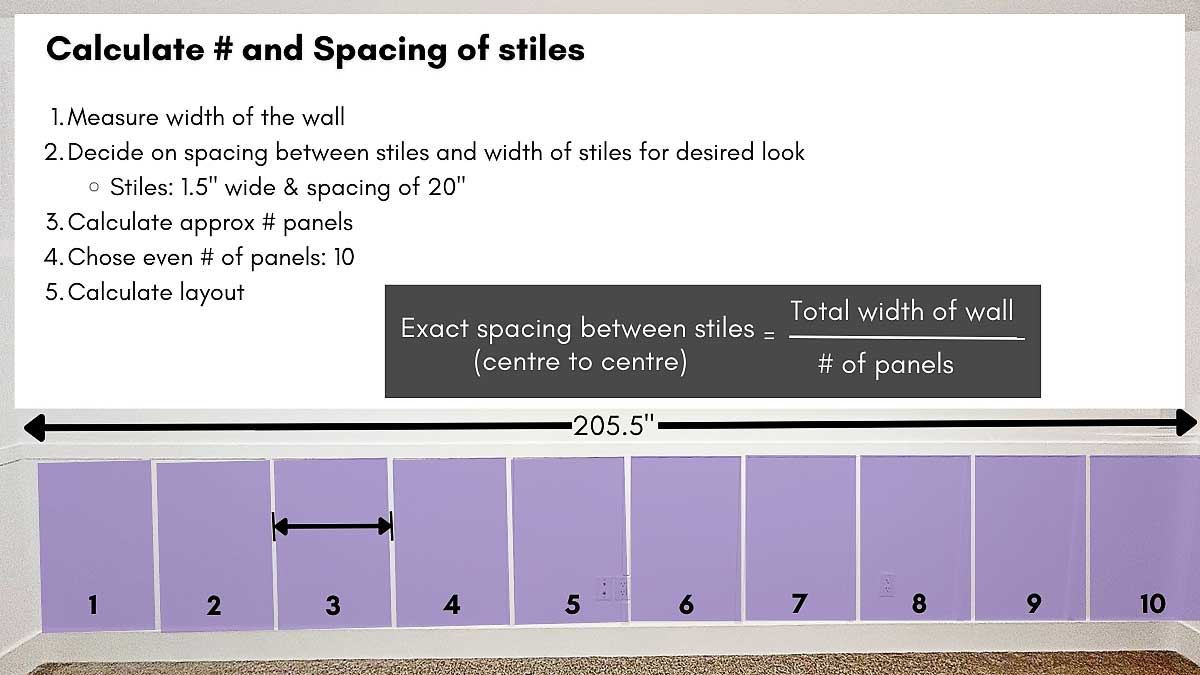
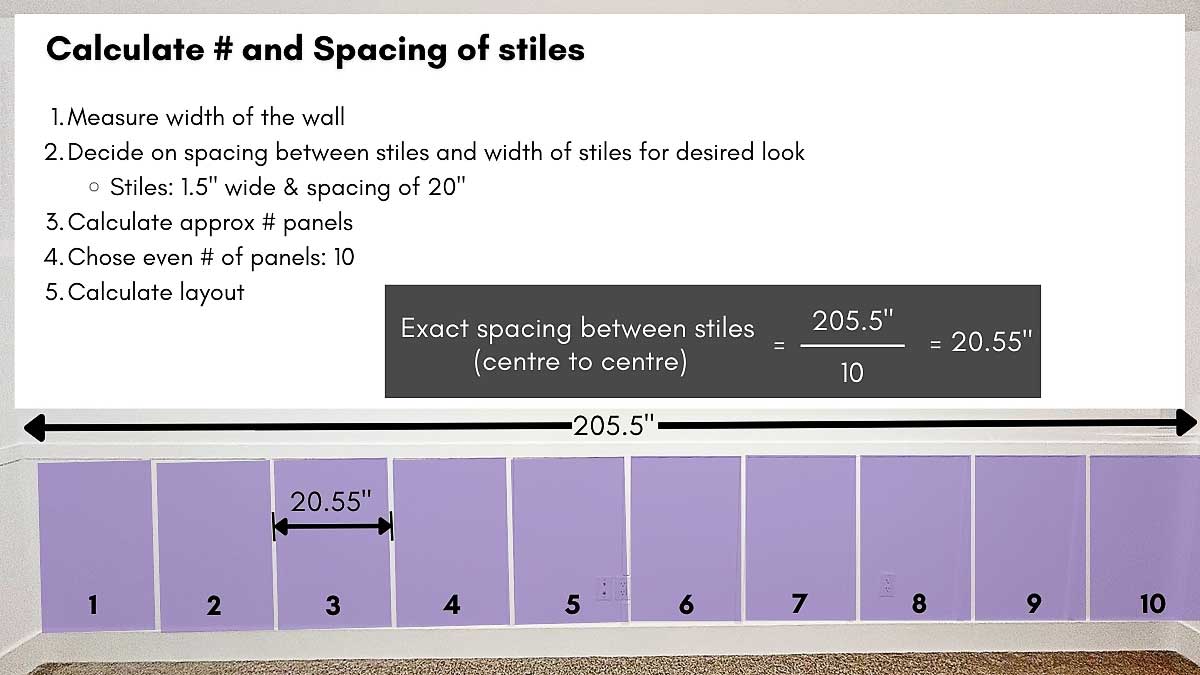
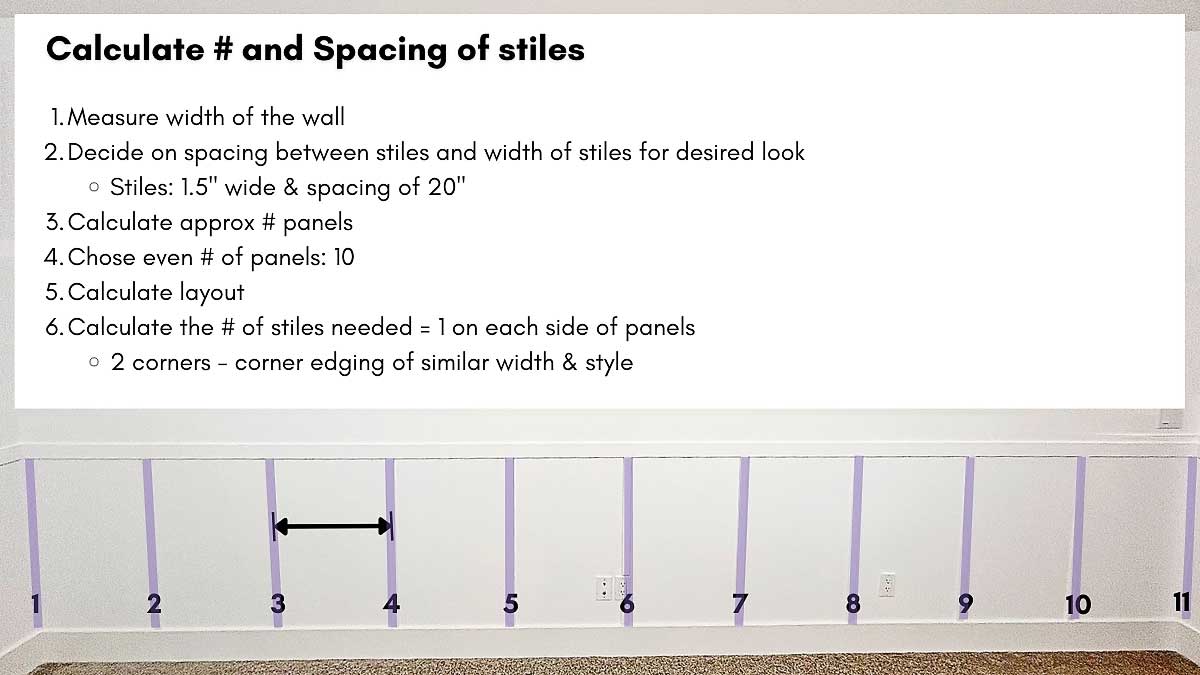
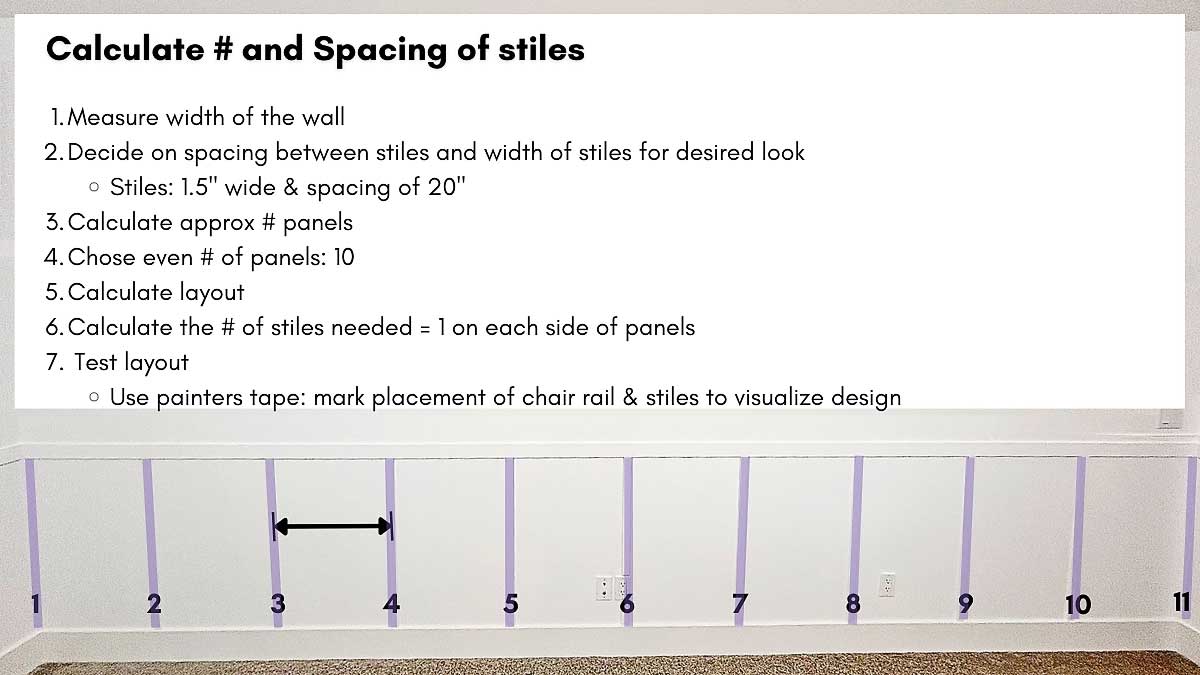
Calculating number and spacing of stiles
Scroll through the below pictures to see exactly how we calculate the number and spacing of stiles.


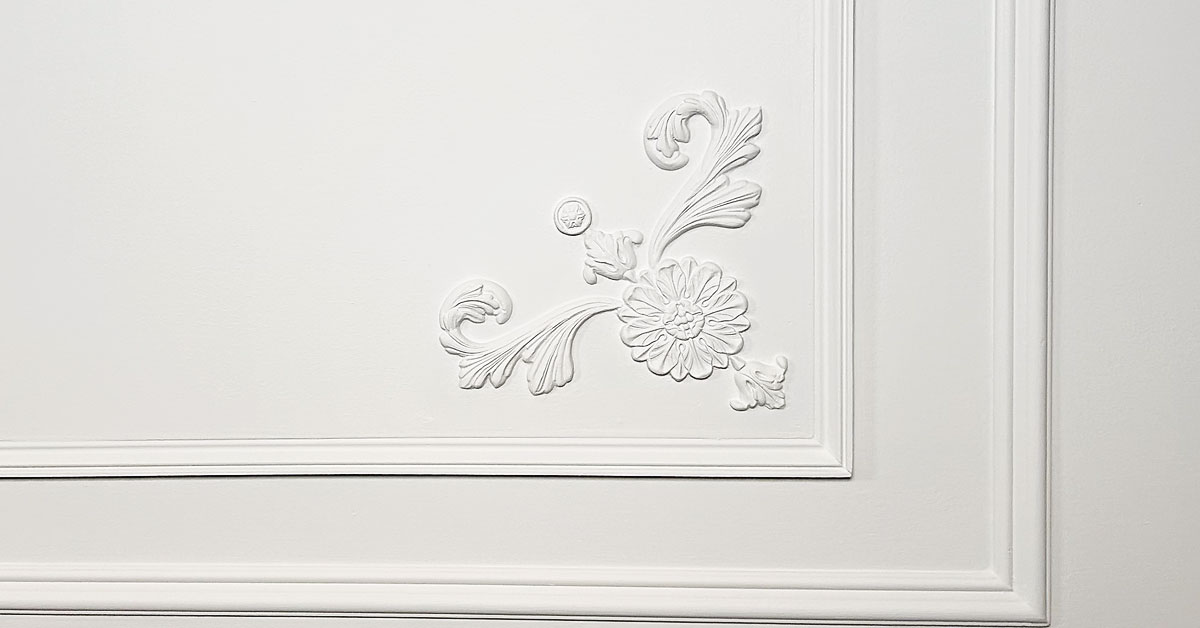
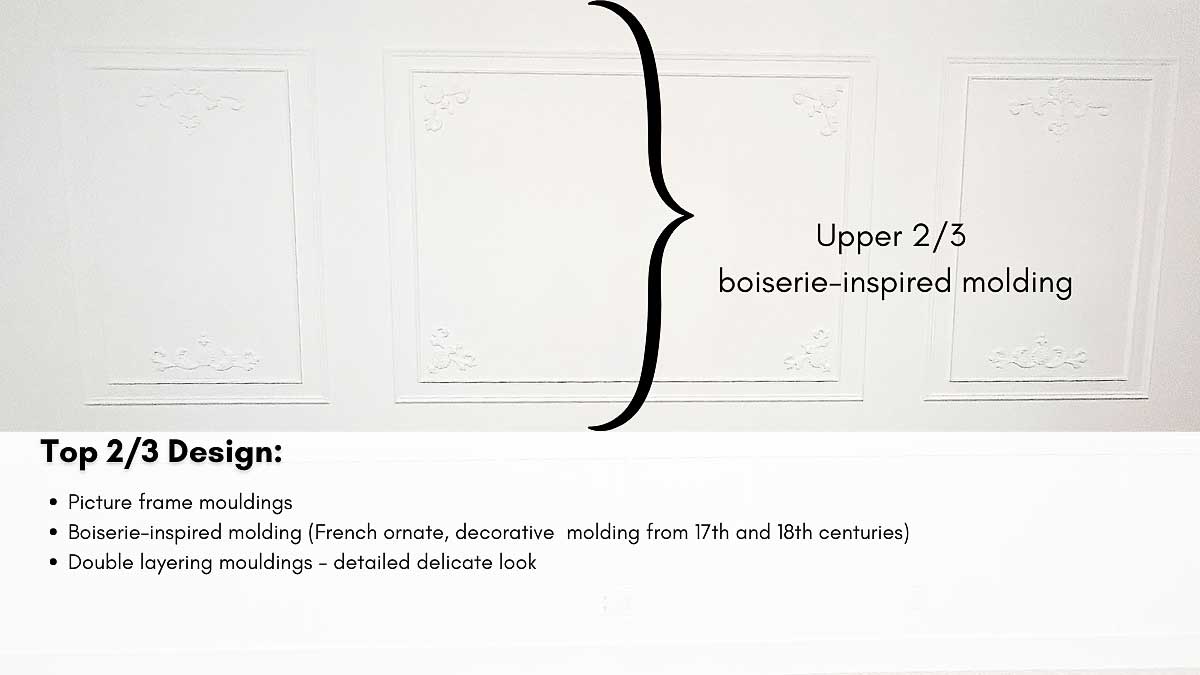
b) upper 2/3 Design (boiserie inspired molding)
We chose a combination of picture frame style moldings and will create a boiserie inspired panel:
- Picture frame mouldings
- Boiserie-inspired molding (French ornate, decorative molding from 17th and 18th centuries)
- Double layering mouldings – detailed delicate look
Steps to double layer picture frame moldings
See my video (time 02:52) for clear visual pictures of how to do the below steps, as well as an example calculation you can follow along with.
- Choose the number of panels
- horizontal: 2-4 panels for a larger wall
- vertical: decide height of panels (align with wall’s proportions & ceiling height)
- Determine Panel Spacing
- margins around panels: consistent spacing between walls, ceiling & mouldings
- depends on size of wall (4-20″ from ceiling, chair rail & corner)
- spacing between panels: maintain equal spacing between adjacent panels (3-10″)
- play around with different spacing using painters tape
- margins around panels: consistent spacing between walls, ceiling & mouldings
- Calculate Panel Dimensions:
- Height-to-Width Ratio: panels are often rectangular, with a height-to-width ratio of 1.5 : 1 to 2 : 1
- e.g. a 36-inch-wide panel could be 54–72 inches tall.
- Proportion to the wall: panels take up 1/3 to 2/3 of wall height balanced look
- Test Layout
- Use painters tape: mark panel outlines to visualize design
- Adjust as needed: step back & make adjustments to ensure proportions good right in the room
Chose Frame Width & Style
Narrower width for smaller panels or modern designs & wider molding for larger panels or traditional designs
- We chose a double frame:
- Outer Frame: MDF edging 1- 1/8″ wide x 3/8″ thick
- Inner Frame: Wood decorative moulding 3/4″ wide x 7/16″ thick
Step 2: building the wainscotting (bottom wall paneling)
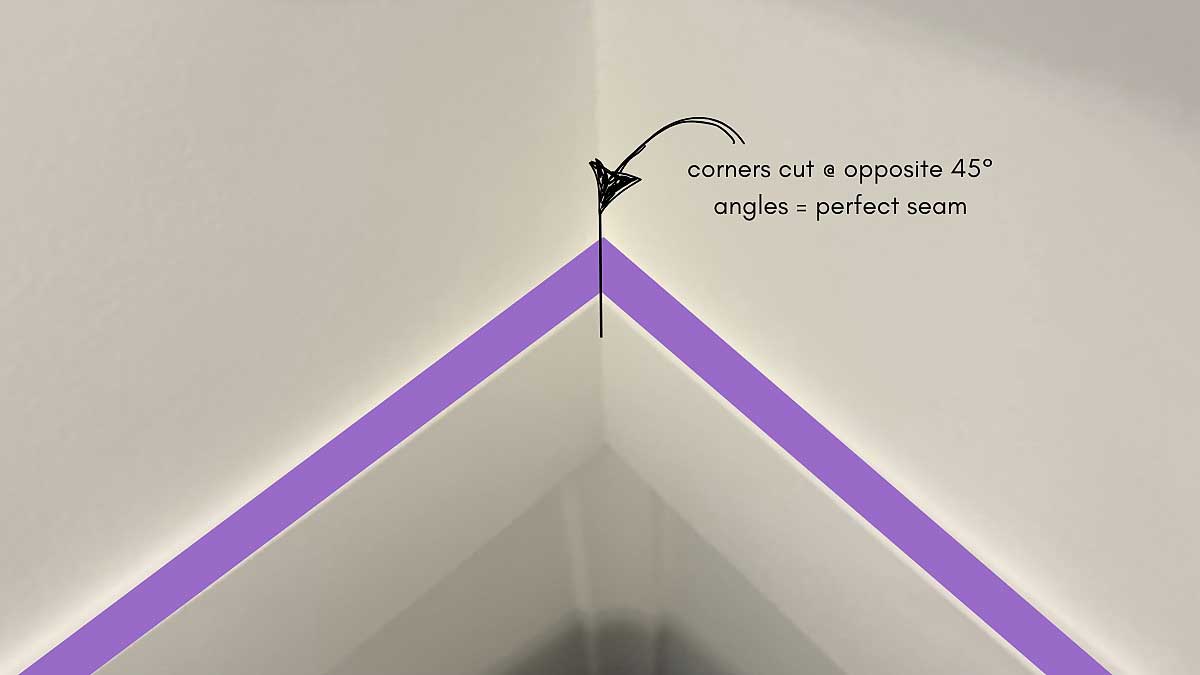
- Measure, cut and install the chair rail
- cut corners at 45° angle (if continuing chair rail)
- add small blobs of PL construction adhesive to back of chair rail every 1 foot, and secure the molding to the wall using a level, adhesive, and finishing nails.
- Where to end the chair rail? (see video for detailed explanation & visual)
- we recommend continuing the chair rail around the room or
- end @ a door frame
- end @ a corner either:
- use a corner edging
- continue around the outside corner and finish on an inside corner
- Measure, cut & install the stiles
- recommend you use a concave corner edging for the two corners.
- ensure dry fit each stile as floor may not be level. Don’t want the stile to bow once glued.
- add a few small blobs of PL construction adhesive to back of each stile and secure to the wall using a level, adhesive, and finishing nails.
Step 3: Build & Install the picture frame wall mouldings
cutting & installing outer picture frame mouldings
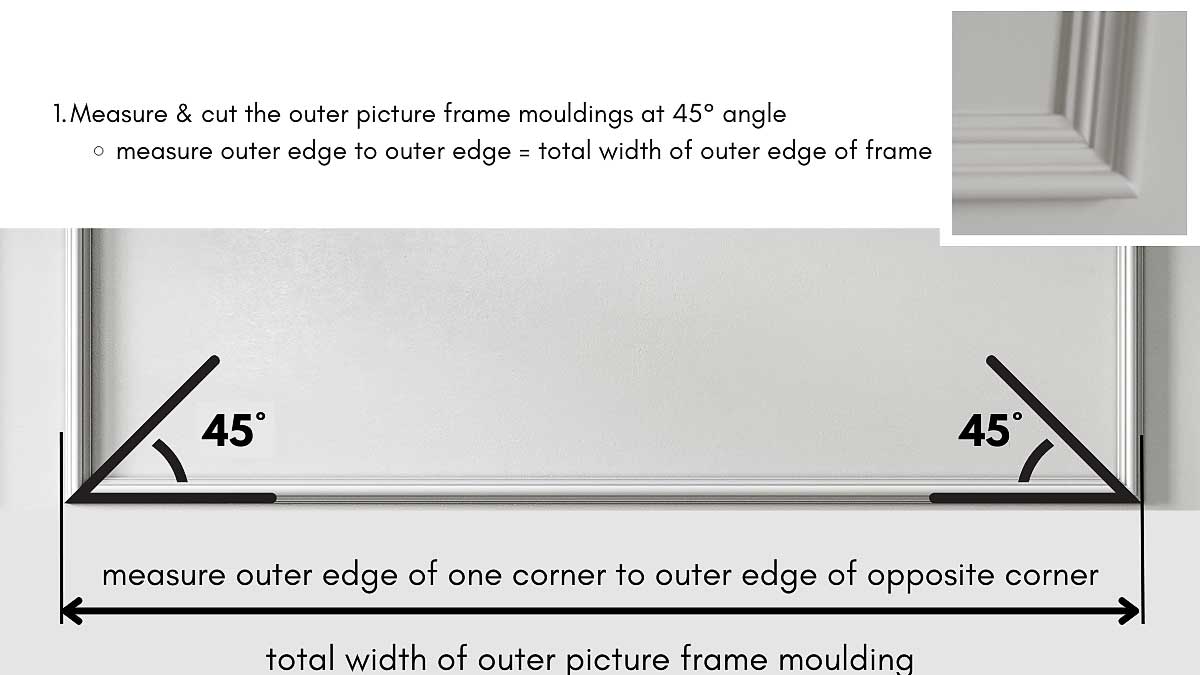
- cut corners at 45° angle from outer edge to inner edge using a mitre saw.
2. Secure the molding to the wall using a level, adhesive, and finishing nails.
- recommend using a carpenters square to ensure corners are perfectly square
- add a few small blobs of PL construction adhesive to back of each moulding and secure to the wall using a level, adhesive, and finishing nails.
designing & building inner frames (boiserie inspired)
- Find your inspiration
- search and find your inspiration for the design of the boiserie
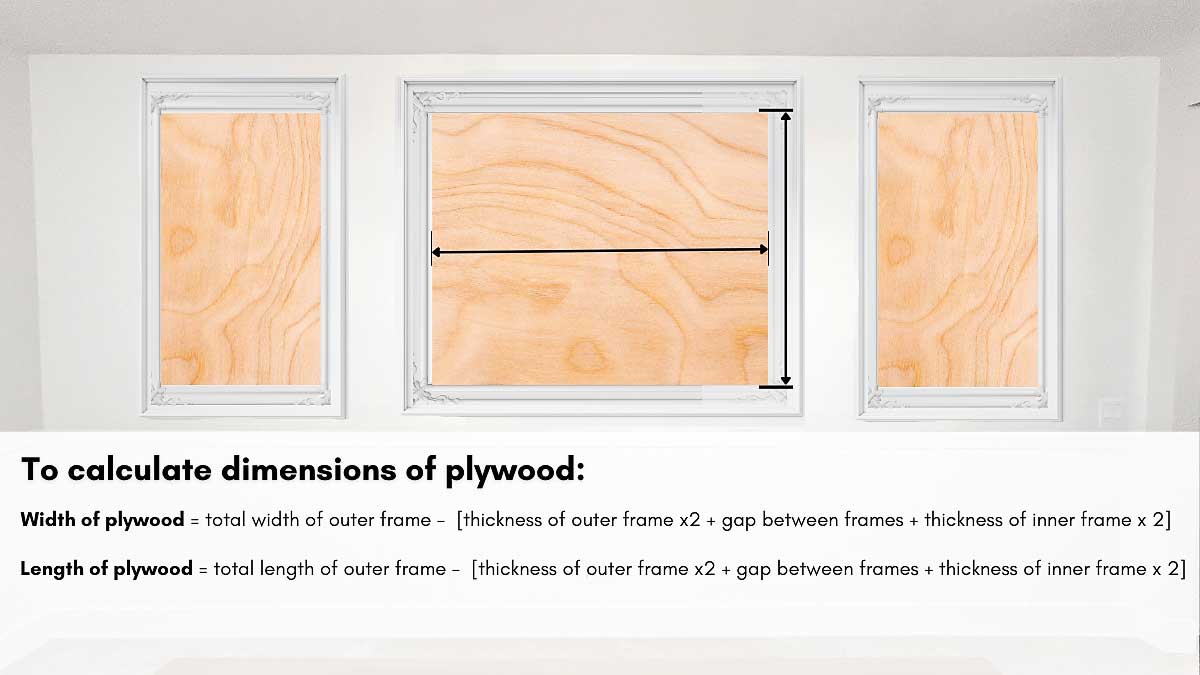
- Use a plywood base for design:
- each panel needs 1 piece
- just fit inside the inner frame
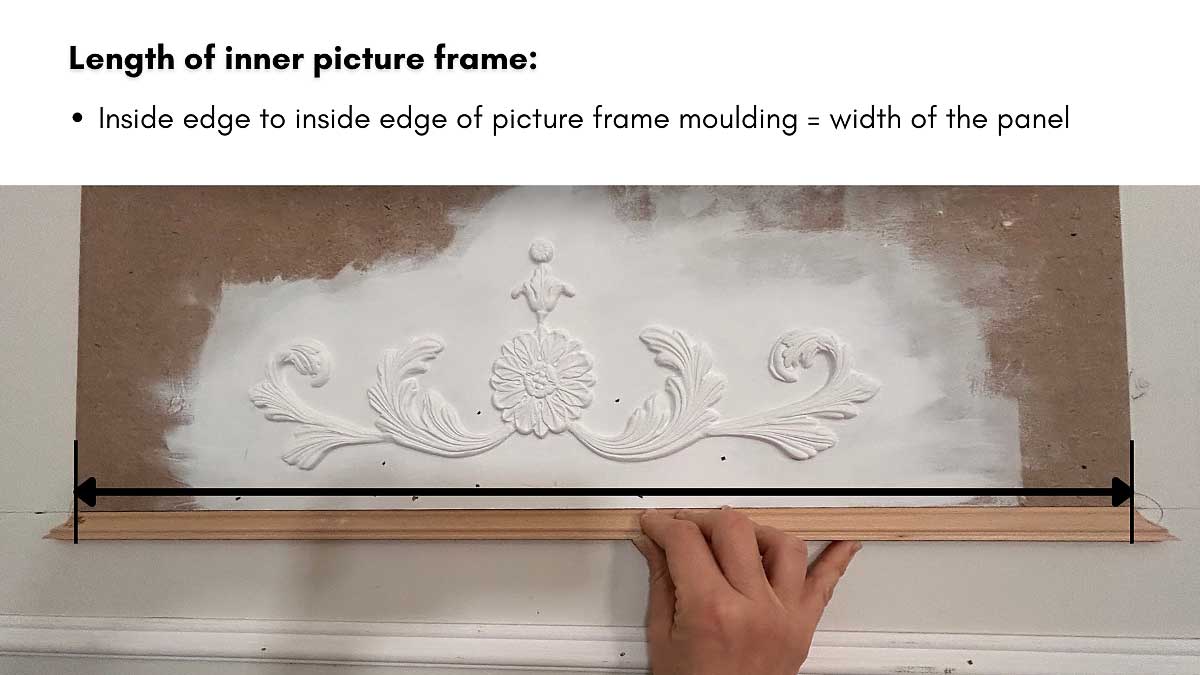
- Dimensions of inner frame:
- decide on spacing between outer & inner frame (recommend 2-3 inches)
- calculate dimensions
- each panel needs 1 piece
3. Create your design
- use a plywood base – create a design, glue & paint all before goes on wall
- clay moulds – use a mix of different moulds (create your own design)
- Can I place clay molds directly on the wall?
- yes but we recommend securing clay design onto plywood then mounting on wall. Consider the below pros and cons to make your choice:
- pros:
- less permanent
- won’t destroy wall if try and remove later
- no gravity – slippage of glue
- no glue drippage
- lots of time to play around with layout
- glue dries quickly – can’t play around with design if mounted directly on wall
- cons:
- more prep work
- extra cost of plywood
- more finishing work – caulking seams
4. Install Finished Wall Panel onto wall
- add some small blobs of PL construction adhesive to back of each panel every foot or so and secure to the wall using a level, adhesive, and finishing nails.
5. Cut and Install Inner Picture Frame Molding
- cut moldings at at 45 degree angle on the mitre saw (see below picture and video)
- add PL glue and place moldings around the plywood wall panel then brad nail into place.
How to create boiserie design using clay molds
I am creating a video with all of my top tips and tricks to help you with creating an original and gorgeous clay design. I will link the video here when it is ready. In the meantime, please watch me create my boiserie-inspired design in our follow-along video for this project. Here are a few tips to help you get started:
Materials needed to create Boiserie wall panel:
Steps to create boiserie Wall Panel using Air-Dry Clay:
- Create your design using combination of shapes with the clay molds.
- Glue clay onto plywood panel in desired location & allow to dry at least 24 hours
- Fill gaps and or cracks with extra clay, smooth out, then allow to dry fully (see video)
- Use silicone caulking to fill in any areas where clay has lifted (see video).
- Paint with 2 coats of desired wall colour. We used Benjamin Moore Chantilly Lace (OC-65).
Top Tips for using Air-Dry Clay:
- Store clay in an air-tight bag
- Use Iron Orchid Designs (IOD) Clay Molds – they are amazing! (I’ll explain all the reasons why in my video)
- Use a scale – decrease waste (IOD molds tell you exactly grams needed per shape)
- Use a starch to prevent clay from sticking to mold
- Use plastic wrap to help smooth clay & keep in moist
Step 4: Finishing Work - caulking, spackling, sanding & painting
This is my least favourite step of ANY project, however, I know it is the MOST CRUCIAL STEP in making any project look beautiful and professional!
- Fill all nail holes with spackling:
- takes more work, but gives the best finish
- use colour changing spackling (turns white once dry)
- fill all plywood nail holes, outer and inner picture frame nail holes & all nail holes in wainscotting
- Finish all edges and corners with caulking:
- use a paintable caulking
- use a wet finger or slightly damp sponge to wipe off excess and create a smooth line (see video)
- Sand with 320 grit sandpaper (once dry) for a smooth gorgeous finish – ensure do not sand any areas that have been caulked.
- Paint 2 coats of paint with your choice of wall colour:
- see video for tips & tricks
- classic French paneling is often painted in soft neutrals, muted pastels, or even luxurious deep tones.
- satin finish enhances the elegance while adding durability.
- decide on look you want:
- all one colour like ours
- panels can be painted slightly different colour or bold colour
Lorem ipsum dolor sit amet, consectetur adipiscing elit. Ut elit tellus, luctus nec ullamcorper mattis, pulvinar dapibus leo.
ENJOY YOUR GORGEOUS french inspired wall paneling!
Watch more diy videos
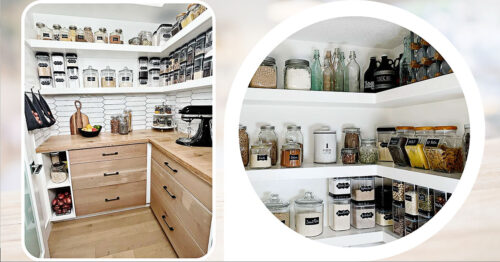
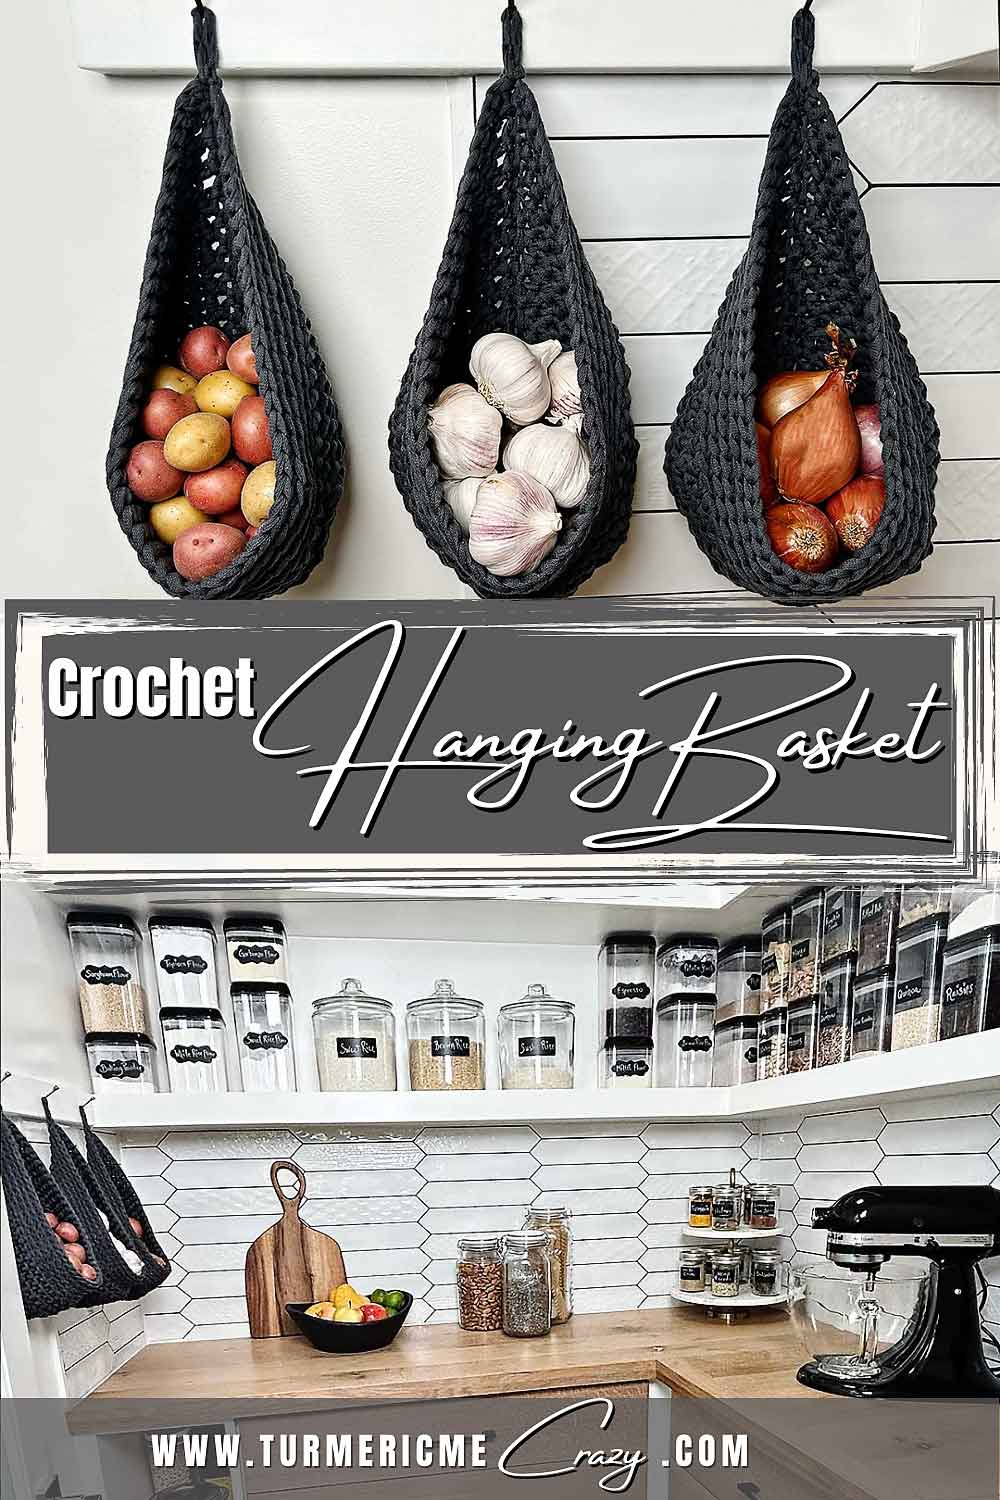
Want to spice up your boring pantry? We have an entire series of videos from that will walk you through creating the pantry of your dreams! We’ve even worked hard to create a printable PDF file for you to use to help guide you and make everything fit your specifications. There’s even a fill in the blank measurements list to help you get started. We hope you enjoy it!
Subscribe to our YouTube Channel to be notified when our next video goes live!
We are always working hard to get new DIY videos ready for you! Please check back again soon and subscribe to our blog & YouTube Channel to find out when our next videos are released.
Please support us ♥︎
If you’re enjoying our free recipes & DIY projects at TurmericMeCrazy and would like to say thank you, here’s how:
1) Buy us a bag of groceries to help support us and say thanks for all of our hard work ♡.
2) Leave us 5  reviews & positive comments on the recipe pages as well as our YouTube Channel.
3) Subscribe to our monthly updates on TurmericMeCrazy.com & to our YouTube Channel.
3) Consider using some of my affiliate links on my website to buy products or check out my favourite kitchen things links.
Your support will allow us to continue to create free content on our blog & YouTube Channel! Thank you so much in advance  . We are truly grateful for the opportunity to help others enjoy creating both in and out of the kitchen!
Want more DIY projects & delicious recipes at your fingertips?
Get updates on our latest posts, DIY projects & recipes from TurmericMeCrazy straight to your inbox!
By clicking subscribe you are consenting to receive emails from TurmericMeCrazy. I will only email you monthly with new recipes & updates. No spam I promise!